PartsBox User's Guide
Introduction
What is PartsBox?
PartsBox is an online tool for managing electronic parts inventory, BOM pricing, and production. It provides a centralized platform for the entire electronics manufacturing process — from sourcing and stocking components to building projects and tracking output.
Key capabilities include:
- Inventory management: track parts, stock levels, and storage locations, with support for linked parts (with manufacturer part numbers), local parts, meta-parts, and sub-assembly parts.
- BOM pricing: price your Bill of Materials using up-to-date offers from online distributors, with support for price breaks, currency conversions, MOQ, and local supplier offers.
- Production: build projects from BOMs, with single-stage and multi-stage builds, sub-assemblies, serial number tracking, and full build history.
- Lot control: trace specific batches of parts from source to use in production, with two-way traceability for quality control and regulatory compliance.
- Purchasing: create and manage purchase orders, track order status, and receive parts into inventory.
- ID Anything™: every object in PartsBox (part, lot, storage location, build, order, project) is assigned a unique, compact code that can be printed as a QR label, scanned with a mobile device, and used for BOM matching in CAD tools. Combined with per-device serial number tracking, this enables full lifecycle traceability from production to field service.
- Barcode scanning and label printing: scan barcodes to quickly look up parts and add stock, and print labels for storage locations and lots.
- CAD integration: import BOMs from KiCad, Altium Designer, and other EDA tools.
- API: programmatic access to your parts database for integration with other systems.
- Reports: inventory valuation, low-stock alerts, and other reports.
Design Philosophy
PartsBox is designed to be fast, unobtrusive, and easy to use. The interface is responsive — searching for parts, checking stock, and managing projects all happen instantly. Multiple users can work simultaneously, with changes visible to everyone in real time.
Unlike traditional ERP (Enterprise Resource Planning) or MRP (Material Requirements Planning) tools, PartsBox is easy to introduce and integrate into an existing workflow, with minimal friction. The goal is a tool that helps you stay organized and efficient without getting in the way.
Getting Started
This section walks you through the basics of PartsBox: creating a storage location, adding a part, stocking it, and building your first project. Each step builds on the previous one, and by the end you will have a working project with a priced BOM. Later sections of this guide cover each topic in much more detail.
Create a Storage Location
Before adding parts, set up at least one storage location to represent where your components will physically live. Navigate to 'Storage' in the top menu and click 'Create'. The default tab is 'Single', which creates one location.
Enter a name for your storage location (for example, 'b01' for your first box, or 'shelf-A1' for a shelf compartment) and click 'Create'. You can always add more locations later, including grids of locations for boxes with compartments.
For suggestions on naming storage locations, see the Storage Locations section under Stock and Storage.
Create a Part
Navigate to 'Parts' in the top menu and click 'Create'. You will see a choice of part types: Linked part, Local part, and Meta part.
Choose 'Linked part' if your component has a manufacturer part number (MPN). Type the MPN into the 'Match exact component name' field and click 'Match'. PartsBox will search for your component and display matching results along with their specifications and datasheet links. Select the correct match from the list and click 'Create Part'.
If your component does not have an MPN (a generic resistor, a PCB, a custom mechanical part), choose 'Local part' instead and enter a name.
For more details on part types, see the What are Parts? section under Parts.
Add Stock
After creating a part, you need to add stock to represent the physical components you have on hand. Navigate to the part's detail page and click 'Add Stock' in the left menu.
The stock wizard has three steps:
- Quantity and pricing: Enter the quantity you have, in the part's unit. For a part with a unit of measure, the quantity can be fractional. Optionally select a price type (per part unit, per vendor package, or entire lot) and enter what you paid.
- Storage location: Select the storage location you created earlier.
- Extra information: Optionally add a comment (for example, 'initial inventory' or an order reference).
Click 'Add Stock' to confirm.
For more about stock management, see the Stock section under Stock and Storage.
Create a Project
A project in PartsBox represents a Bill of Materials (BOM). Navigate to 'Projects' in the top menu and click 'Create'. Enter a name (and optionally a description) for your project and click 'Create Project'.
Add a Part to the Project
Open your newly created project and navigate to the 'BOM' tab. Click 'Add part entry' to open the part picker. Search for the part you created earlier, select it, and confirm. The part will be added to the BOM with a default quantity of 1. You can then click on the entry to expand it and adjust the quantity, add designators, or configure other fields. If the part has a unit of measure, the quantity is entered in that unit and can be fractional (for example, 1.5 m).
Create a Project by Importing a BOM
If you already have a BOM exported from a CAD tool (KiCad, Altium, Eagle, or any other tool that can export CSV), you can create a project by importing it. Navigate to 'Projects' and click 'Import'. Upload your CSV or TSV file.
PartsBox will parse the file and show a preview. Adjust the field separator and character encoding if needed until the preview looks correct. Then map each column to the appropriate BOM field using the dropdowns above each column. The 'Guess' button can often get the mappings right automatically, but always review the result. The most important mappings are 'Quantity', 'Part', and 'Designators'.
After mapping columns, PartsBox will attempt to automatically match each BOM entry to a part in your database. Entries that match a part are shown with the part name; unmatched entries are highlighted. If you created the part from the previous steps and the BOM contains the same MPN, it will be matched automatically.
To manually match an unmatched entry, click on it to expand the entry details. In the 'Part matching' section, click 'Match to an existing part' to open the part picker and select the correct part. You can also create a new part directly from there if needed.
Once you are satisfied with the mappings and matches, enter a project name and click 'Import'.
For more details on BOM importing, matching, and managing entries, see the Working with BOMs section under Projects and BOMs.
Working with Data
PartsBox uses tables extensively to display and manage data. Many features – such as searching within tables, filtering, table configuration, bulk operations, custom fields, tags, and attachments – work consistently across different types of data (parts, lots, storage locations, orders, projects, BOM entries, and builds). This section describes these cross-cutting features.
Tables
Tables in PartsBox are interactive and feature-rich. They support searching, filtering, column configuration, sorting, bulk selection, and exporting to PDF or CSV. Table settings are remembered per table, so your preferences persist across sessions. The features described below apply to most tables in the application.
In-Table Search
In addition to the main parts search box (described in the Parts section), search capabilities are available in most tables throughout the application. These in-table search boxes offer exact matching functionality to help you quickly narrow down the rows displayed. Simply type in the search box above a table to filter its contents. The search considers values across all visible columns.
Filtering
Most tables in PartsBox support advanced filtering capabilities, allowing you to quickly narrow down the displayed data to match specific criteria. The filtering system is highly configurable and supports complex logical conditions. This section will guide you through the process of creating, using, and managing filters in PartsBox.
Applying Filters to Tables
To filter the data in a table, follow these steps:
- Locate the filter icon in the top right corner of the table you wish to filter.
- Click on the filter icon to open the filter configuration screen for that table.
- Add filter conditions using the "Add Condition" or "Add multiple conditions" buttons. You can combine multiple conditions using logical AND/OR operators.
- For each filter condition, select a field, choose a condition, and enter a value.
- Once you have defined your filter conditions, click the "Apply filters" button at the bottom of the screen to apply the filters to the table.
To quickly remove all currently applied filters from a table, use the "Remove all filters" button. If you plan to reuse the filter in the future, make sure to save it as a preset before removing it.
Defining Filter Conditions
Filter conditions are the building blocks of your filters. Each condition consists of a field, a condition, and a value:
- Field: Select the field you want to use for filtering from the list. The available fields will vary depending on the table and the data it displays. For example, "[Storage] Tags" represents tags assigned to a storage location.
- Condition: Choose a condition that matches your filtering requirements. The list of available conditions depends on the selected field type. For instance, if you select "[Storage] Tags", you'll see conditions like "contains all of these tags", "contains any of these tags", and "does not contain any of these tags".
- Value: Enter the value that the condition should match. Depending on the field type, it could be a list of tags (for a tag field), a text string, a number, or a number range (interval).
You can combine multiple filter conditions using logical AND/OR operators. PartsBox supports nested conditions, allowing you to create complex filtering logic by adding single conditions or multiple conditions combined with AND/OR under each AND/OR statement.
Entering Numerical Values
When entering numerical values in filter conditions, you can use unit prefixes for convenience. Simply enter the prefix without the unit. For example, use "22u" instead of "22μF" and "10k" instead of "10kΩ". Note that the prefixes are case-sensitive, so "m" and "M" represent different values.
PartsBox supports the following unit prefixes:
- T: tera (1012)
- G: giga (109)
- M: mega (106)
- k: kilo (103)
- d: deci (10-1)
- c: centi (10-2)
- m: milli (10-3)
- u or μ: micro: (10-6)
- n: nano (10-9)
- p: pico (10-12)
- f: femto (10-15)
Managing Filter Presets
PartsBox allows you to save your filters as presets, which can be either personal or shared within your company. This feature enables you to quickly load complex filters and define filters that are useful for everyone in your organization.
To manage your filter presets:
- Use the "Load Preset" button to apply a previously saved filter preset to the current table.
- Click "Save Preset" to save the current filter configuration as a new preset. Choose whether to save it as a personal preset or a company-wide preset.
- Click "Manage Presets" to access additional preset management options:
- Delete unwanted presets
- Duplicate existing presets
- Copy or move presets between your personal presets and company presets
Quick Access to Filter Presets
When you save filter configurations as presets, they appear in a dropdown menu in the table header. This provides fast access to your commonly used filters and makes switching between different views efficient.
Filter presets can function similar to categories when based on tags or names. Unlike rigid category systems where each item belongs to only one category, presets offer more flexibility by allowing items to appear in multiple filtered views simultaneously. This approach gives you the organizational benefits of categories without their typical limitations.
Table Configuration Presets
In addition to filter presets, PartsBox allows you to save and share table column configurations as presets. This is useful when different users in your organization need to see the same columns in a consistent layout, or when you want to quickly switch between different column arrangements for different tasks.
Table configuration presets store the selection of columns, their order, and their relative widths. Like filter presets, they can be saved as personal presets (visible only to you) or as company-wide presets (shared with all users in your organization).
To save a table configuration as a preset:
- Click the table configuration icon (columns icon) in the table header to enter configuration mode.
- Add, remove, and arrange columns as needed. You can drag column edges to resize them.
- Use the "Save as preset" button at the bottom of the configuration panel.
- Enter a name for the preset and choose whether to save it as a personal or company-wide preset.
- Click "Save" to confirm.
To load a saved table configuration preset:
- Use the "Load configuration preset..." dropdown that appears in the table header (when presets are available).
- Select a preset from the list. Personal presets show "(personal)" and company presets show "(company)" next to their names.
- The table will immediately update to show the saved column configuration.
You can also manage your presets by clicking the table configuration icon and using the "Manage presets" button to:
- Rename presets by clicking on their names
- Delete presets you no longer need
- Duplicate presets to create variations
- Copy presets between personal and company collections
- Move presets from personal to company (or vice versa)
Table configuration presets are particularly helpful for teams that need consistent views across different users, such as ensuring everyone sees the same columns when exporting data or reviewing inventory.
Table Exports
Most tables in PartsBox can be exported as PDF or CSV using the Export button in the table footer. The export includes all rows matching the current search and filter criteria, using the currently configured columns.
Each table has two separate column configurations: one for display and one for export. Exporting often requires a different set of columns than what you see on screen, so these are maintained independently. When you enter table configuration mode (by clicking the columns icon in the table header), a selector on the left side lets you switch between editing the display configuration and the export configuration. If you find that exported data does not match what you see on screen, check the export column configuration — it is likely set to different columns.
PDF exports produce high-quality output with a header containing the document title and your company logo (if uploaded in Settings > General, see the Organizations and Access section), and the table data with formatting appropriate for print. Images and URLs present in table columns are included in the PDF export. Thumbnail images are shown inline where applicable.
CSV exports produce a standard comma-separated file suitable for use in spreadsheets and other tools.
Operations on Multiple Items
Many tables in PartsBox support selecting multiple items and performing bulk operations on them. This pattern works consistently across parts, lots, storage locations, orders, projects, BOM entries, and builds.
To select items, use the checkboxes next to each row. The application remembers your selections as you search and filter, so you can build up a selection over time without losing previously selected items. Use the checkbox in the table header to select or deselect all visible items. Once you have selected items, use the "Selected..." menu to access available operations. The specific operations differ depending on the type of data you are working with – see the relevant sections for details.
Custom Fields
Custom fields provide a flexible way to store and organize structured data for various objects in PartsBox. Custom fields can be added to parts, lots, storage locations, orders, projects, project (BOM) entries, and builds.
Unlike notes or comments, custom fields are structured, indexed for searching, and can be used in table columns and filtering throughout the application. This allows you to define and store additional attributes specific to your organization's needs, workflows, or industry requirements.
Some examples of how custom fields might be used:
- For parts: distributor part numbers, reliability levels, environmental compliance status
- For storage locations: temperature ranges, ESD protection levels, ownership information, MSL level
- For lots: supplier batch numbers, expiry dates, quality inspection status
- For orders: approval status, shipping methods, customs documentation
- For projects: project managers, development stages, regulatory approvals
- For builds: batch numbers, production line identifiers, quality control status
Custom fields are fully integrated into the PartsBox interface and can be:
- Added to table views as columns
- Exported in PDF or CSV table exports
- Used for searching
- Used in filters
Bulk Custom Field Operations
When working with multiple items, you can perform bulk operations on custom fields:
- Set custom field: Add or update a custom field value on all selected items at once
- Rename custom field: Change a custom field name across all selected items
- Delete custom field: Remove a custom field from all selected items
To use these operations:
- Select multiple items in a table using checkboxes
- Use the bulk actions menu to choose the custom field operation
- Follow the prompts to complete the operation
These bulk operations are available for parts, lots, storage locations, orders, projects, project entries, and builds.
Tags
Tags categorize and organize your data in PartsBox. By applying tags to various objects such as parts, storage locations, projects, orders, lots, and builds, you can quickly find and filter specific subsets of your data.
Applying Tags
Tags can be assigned either from info/editing screens or by selecting multiple items and using the 'Add/Remove Tags…' option from the 'Selection' menu.
When adding tags, simply enter the tag name without the leading # character. An object can have any number of tags attached to it.
Searching with Tags
Tags play an important role in searching and filtering your data. When you enter a tag in the search box (preceded by the # character), PartsBox will limit the search results to objects that have that specific tag assigned to them.
Tags are matched exactly. If you enter multiple tags in the search box, an object must have all the specified tags to be included in the results.
Auto-Tags for Parts
PartsBox automatically generates auto-tags for your parts based on their specifications. These auto-tags are stored independently from your manually assigned tags, so a tag with the same name as an auto-tag does not conflict with it.
Auto-tags group parts with similar specifications together without manual effort, which makes them easier to find and manage.
Attachments
PartsBox allows attaching arbitrary files to parts, lots, projects, storage locations, orders, local offers, and builds. This feature is useful for keeping all relevant information organized and easily accessible. Some common examples of files you might want to attach include:
- Datasheets for electronic components
- 3D CAD models of mechanical parts
- Invoices and packing slips for orders
- Quality control documents and test reports
- Product photos and images
- Application notes and reference designs
- Certificates of conformance (CoC) and material safety data sheets (MSDS)
By attaching these files directly to the relevant items in PartsBox, the information stays with the item it describes. There is no need to maintain naming conventions or directory structures, or to remember where files are stored on a server.
Attachments are stored securely in the cloud and can be accessed from anywhere.
When viewing the detail page for an item with attachments, you'll see a list of all attached files. Clicking on a filename will download the attachment to your computer. You can also rename attachments, or delete them if they are no longer needed.
Attachments keep essential documentation organized and connected to the relevant items in your inventory, so everyone on your team has access to the information they need.
Parts
What are Parts?
PartsBox is all about electronic components, so a 'part' is a fundamental concept. A part represents an electronic or mechanical component. There are several types of parts:
- Linked Parts are for components with manufacturer part numbers (MPNs). If a part has an MPN and you can find it online, choose this option. You will instantly get a description, a datasheet link, a link to the manufacturer's site, part specifications, a thumbnail image, and PartsBox will be able to get pricing and availability information about this part from distributors.
- Local Parts are for everything else: generic and no-name components, PCBs, custom parts, mechanical parts, and anything that does not have an exact part number.
- Meta-parts group parts that are interchangeable (exact substitutes for one another).
- Sub-assembly parts are the result of building a project and correspond 1:1 to projects.
Note that for generic and no-name components (e.g. a no-name NE555 in a DIP package) it's usually better to use local parts. There are hundreds of versions of the NE555 and your particular version might be slightly different from someone else's. So use linked parts only for exactly matching components (for example if you have a 'NE555PWG4' from Texas Instruments, link it).
Parts are abstract: they describe the component, but until you add actual stock, they don't represent physical things. Even parts without stock are useful—for example, you can add them to projects (BOMs) to get pricing for your projects.
Linked parts have two names: the local (internal) name and the official MPN. In the free hobbyist plan, the local name must be the same as the MPN. In commercial plans, both names can be used, and the local name can be different from the MPN. The local name can be changed by renaming the part.
Apart from standard attributes like a name or manufacturer, parts can also have custom fields/attributes (in plans that support this feature). Like the 'Notes' field, these can be used to store any data but in a more structured manner. Some usage examples include Distributor, Distributor Part Number, Supplier Part URL, Weight, or Container Tare Weight. Custom fields are indexed for searching.
Units of Measure
Most parts are counted in whole pieces, and this is the default. PartsBox does not require you to set a unit, and ordinary components such as resistors, capacitors, and ICs are always counted in pieces.
Some materials are measured rather than counted. Wire is measured by length, solder paste by weight, and so on. For these, you can give a part a unit of measure. PartsBox supports units in five categories:
- Length: meters, centimeters, millimeters, inches, feet, and others.
- Area: square meters, square centimeters, square inches, and others.
- Mass: kilograms, grams, milligrams, pounds, ounces.
- Volume: cubic meters, liters, milliliters, gallons, and others.
- Time: seconds, minutes, hours, days, and others.
When a part has a unit of measure, you can enter fractional quantities for it. For example, you can have 2.5 meters of wire in stock, require 1.5 meters of it in a project, or set a low-stock threshold of 0.5 meters. Quantities are stored and shown in the part's own unit, with the unit symbol next to the value (for example, "2.5 m"). Parts without a unit are counted in whole pieces, and fractional piece counts are not allowed.
To set a part's unit, open the part's Settings page and find the 'Unit of measure' section. Sub-assembly parts are always counted in pieces and cannot have a unit.
Package Quantity
Vendors often sell a measured part in fixed amounts. Wire might be sold on spools of 10 meters, and paste in jars of 500 grams. The package quantity is how much of the part, in its own unit, you receive when the vendor sells one of these. For wire tracked in millimeters and sold on spools of 10 meters, set the package quantity to 10000 (millimeters per spool). For a part the vendor sells one at a time, the package quantity is 1.
A minimum purchase amount is not a package quantity. Electronic parts are often sold on reels of 5000, but the price is still quoted per single piece. In that case, leave the package quantity at 1: the reel size belongs in the offer's minimum order quantity.
PartsBox uses the package quantity to convert between what the vendor sells (whole packages) and what you track (the part's unit). When you order three spools, PartsBox records the order in spools and your stock in the part's unit. Pricing uses it to show both the price per package and the price per unit. Set the package quantity in the part's Settings page. It cannot be changed while the part has open orders, so receive or cancel those orders first if you need to change it.
Changing a Part's Unit
Change a part's unit from the 'Unit of measure' section using the 'Change unit…' button, not by editing the part directly.
You can set, change, or remove the unit freely while the part is new and unused: it has no stock, is not used in any project, BOM, or purchase list, has no orders, and is not linked to other parts as a substitute or meta-part member.
Once the part has stock or is used in a BOM, PartsBox can still change the unit, but it reinterprets the stored quantities: the numbers stay the same and only their meaning changes. A stock quantity of 5 becomes "5 mm" when you assign millimeters, or "5 cm" when you switch from millimeters to centimeters. PartsBox warns you before doing this, because it cannot be undone.
Once the part is referenced by an order, used as a substitute for another part, or is a member of a meta-part, its unit is locked. To change it, first remove those references.
When a part has substitutes of its own, or a meta-part has members, the unit can only change within the same measurement category: for example from millimeters to centimeters, but not from millimeters to kilograms or back to pieces.
Parts created before units of measure were introduced keep their piece counts and need no changes.
Adding Parts
Creating Parts
To add a new part, navigate to the Parts section in the main menu and use the 'Create' button to open the create part dialog.
The 'Part Type' field determines the kind of part that will be created:
- 'Linked part': Use for components with a unique manufacturer part number (MPN).
- 'Local part': Use for generic components and anything else that needs to be tracked.
- 'Meta part': Use when you need to create a virtual part that represents several equivalent part options (substitutes).
Creating Linked Parts
There are two methods for searching for linked parts:
- Match exact component name (MPN): The beginning of the part name must match (prefix search). For example, 'TPS40210' will match 'TPS40210DGQ'. This is the preferred method for matching components.
- Search: This is a fuzzy search, useful for queries like 'adafruit 1063'.
After entering a search term and clicking either 'Match' or 'Search', the results will be displayed. Choose the part that exactly matches your requirements, paying close attention to small variations in naming, as they can indicate significant differences in the actual components. When you select a result, its specifications will be shown, and a datasheet link will be provided next to each component, if available.
For commercial users, it is possible to immediately assign a local (internal/company) part number to a linked part.
Creating Local Parts
When creating local parts, only the part name is required; all other fields are optional.
Certain plans allow for uploading and attaching datasheets, images, CAD models, and other information to parts. This is done after the part has been created.
Creating Meta Parts
To create a meta part, provide a name and optionally a footprint and description. The newly created meta part will be empty, meaning it will not contain any member parts (substitutes). These will need to be added later, either by using the 'Add part' button on the meta-part info screen or by selecting multiple parts in the main parts table and using the 'Selected | Add to meta-part' option.
Converting an Existing Part to a Meta-Part
If you have an existing part with stock, offers, and usage history that should become a meta-part, you can convert it rather than creating a new empty meta-part. This is useful when you realize a part you've been using should actually represent a group of interchangeable alternatives.
A part can be converted to a meta-part if it is not already a meta-part, is not a sub-assembly, and is not archived.
How to convert:
- Go to the part's information screen
- Click "Other Operations"
- Click "Convert to Meta-Part"
- Review the preview showing how many project and list entries will be updated
- Optionally rename the meta-part (it defaults to the original part name)
- Optionally check "Include substitutes as members" to add existing substitutes as meta-part members
- If the part has attachments, optionally check "Move attachments to meta-part"
- Click "Convert"
What happens during conversion:
- A new meta-part is created with the specified name
- The original part becomes a member of the new meta-part
- Fields copied to the meta-part: name, description, notes, footprint, tags, and custom fields
- CAD fields (KiCad symbols/footprints/references, Altium library refs/footprints) are moved to the meta-part and removed from the original part
- If the part has an image, it is copied to the meta-part (both keep the image)
- Attachments are optionally moved to the meta-part (if you check the option)
- Current project entries and list entries are updated to reference the meta-part
- Other parts' substitute references that pointed to this part are updated to reference the meta-part
- If "Include substitutes as members" is checked, all valid substitutes become members of the new meta-part
- Locked offers on entries are cleared
What stays unchanged:
- Stock, lots, and offers remain with the original part (now a member of the meta-part)
- Build history entries remain unchanged (they reference parts at build time)
- Entry-level substitute references are not changed (these are specific to each entry)
Globally Replacing a Part in All Projects
When a part becomes obsolete or discontinued, you may want to replace it with a different part across all your projects. Rather than editing each project entry individually, you can use the "Replace in projects" operation to do this in one step.
How to replace:
- Go to the part's information screen (the part you want to replace)
- Click "Other Operations"
- Click "Replace in projects"
- Select the replacement part using the part picker
- Optionally check "Also replace in entry-level substitute references" if you want substitute references on individual entries to be updated as well
- Click "Replace"
What happens during replacement:
- All current project entries that reference this part are updated to reference the replacement part
- Locked offers on affected entries are cleared (since the part has changed, previously locked offers no longer apply)
- If "Also replace in entry-level substitute references" is checked, any entry-level substitute references pointing to this part are updated to point to the replacement part
What stays unchanged:
- The original part itself is not modified or deleted — it remains in your parts list with all its data
- Part-level substitutes are not changed
- List entries (purchase lists) are not affected
- Build history entries remain unchanged (they reference parts at build time)
Replacing a Part in Selected Projects
If you want to replace a part only in specific projects rather than across all projects, you can do so from the Projects list using bulk selection.
How to replace in selected projects:
- Go to the Projects list
- Select one or more projects using the checkboxes
- Click "Selected..."
- Click "Replace part..."
- Select the source part (the part you want to replace) — the part picker is filtered to show only parts that are actually used in the selected projects
- Select the replacement part
- Optionally check "Also replace in entry-level substitute references"
- Click "Replace"
This is useful when a part substitution only applies to certain projects, or when you want to roll out a replacement gradually, project by project.
The same behaviors apply as with the global replace: locked offers on affected entries are cleared, list entries and build history are not affected, and the original part is not modified or deleted.
Searching for Parts
Searching is a fundamental feature in PartsBox that allows you to quickly find the parts you need. The main search box is located at the top of the Parts section.
The parts search engine employs fuzzy matching, which means that even if your search terms don't match exactly, relevant results will still be displayed. To help you quickly identify the most relevant matches, exact results are visually distinguished from partial matches using different background colors.
When searching for parts, the following fields are included in the search scope:
- Name
- MPN (Manufacturer Part Number, if different from the name)
- Manufacturer
- Description
- Footprint
- Part notes
- All custom fields
In addition to searching by keywords, you can also search using tags. To search by tag, simply enter the # character followed by the tag name. Tags are matched exactly, and if you enter multiple tags, a component must have all of the specified tags to be included in the results.
For even greater flexibility, you can combine keywords and tags in your search queries. This allows you to create highly targeted searches that help you find exactly what you need, even in large and complex parts databases.
In addition to the main parts search, most tables throughout the application have their own search functionality. See the In-Table Search section under Working with Data for details.
Deleting Parts
There are two ways to delete a part:
- From the part information screen, by going into "Other Operations" and clicking the "Delete Part" button.
- From the parts table, by selecting multiple parts and choosing the "Delete..." operation in the "Selected..." menu.
Deleting a part is a destructive operation that is not recommended unless you are deleting a newly created part that has never been used in builds and has never had any stock added. When you delete a part, PartsBox will be unable to resolve references to that part in past build history. In general, avoid deleting parts that have been used in builds.
Most of the time, it is better to archive a part instead (see below).
Archiving Parts
A part that has been archived will not show up in regular tables and searches, which prevents it from interfering with normal usage. It will still be available in the "Parts | Archived" table and will remain visible in build histories.
To archive a part, go to "Other Operations" in the part information screen and click the "Archive Part" button.
The part being archived should have no stock (either on-hand or ordered). Archiving a part that has stock is typically not logical. Even though archived parts don't appear in standard tables and searches, they still affect reports such as the parts value report or storage location value report. For this reason, you cannot archive a part with existing stock. You must first remove stock from the part manually and/or remove the part from orders before archiving it.
Archiving is the recommended approach for parts you don't want to see in your daily database operations. Only delete parts that were created by mistake and have never been used.
Operations on Multiple Parts
For general information about selecting and operating on multiple items, see the Operations on Multiple Items section under Working with Data. The operations specific to parts are described below:
- Add/remove tags: Edit tags for the selected parts in bulk. You can add new tags or remove existing ones, making it easier to categorize and organize your parts.
- Add to project: Add the selected parts to a specific Project/BOM. You'll be prompted to choose the target project.
- Add to meta-part: Add the selected parts to an existing meta-part or create a new one. Meta-parts group interchangeable parts (substitutes).
- Add to purchase list: Add the selected parts to a purchase list when you need to order them.
- Set low-stock levels: Set the low-stock threshold for all selected parts at once. These thresholds help you maintain adequate inventory. A threshold is interpreted in each part's unit, and can be fractional for parts with a unit of measure.
- Set part attrition: Set attrition parameters for the selected parts. Attrition accounts for expected component loss during the manufacturing process.
- Download as CSV: Export the list of selected parts as a CSV (Comma-Separated Values) file for use in spreadsheets or other external tools.
- Delete: Permanently remove the selected parts from your PartsBox database. A confirmation prompt will appear to prevent accidental deletions. Consider archiving parts instead of deleting them.
- Deselect all: Clear the current selection without performing any operations on the selected parts.
Substitutes
In electronics manufacturing, it's common for a part to have possible substitutes: functionally equivalent components that can be used interchangeably. PartsBox provides several ways to define substitutes, each with its own semantics and use cases.
Meta-Parts
Meta-parts allow you to group several substitute parts (known as member parts) under a single name. This name can then be used in Projects and BOMs. Meta-parts are logical groupings that provide an aggregate view of the stock for all their member parts. They also enable low-stock alerts at the meta-part level.
A good example of when to use a meta-part is for components like 'TPS61161DRVR' and 'TPS61161DRVT'. These are the same part, just in different packaging. By creating a meta-part called 'TPS61161DRV' and using that name in your BOMs, you can manage their inventory as if they were a single part. The 'TPS61161DRV' meta-part will show the combined stock for both packaging variants.
A meta-part has its own unit of measure, and its member parts must use a unit in the same category. For example, a meta-part measured in centimeters can include members measured in inches or feet, but not in grams. A meta-part with no unit can only contain members counted in pieces. The aggregate stock is shown in the meta-part's own unit, converting members tracked in other units of the same category. The same part can be a member of several meta-parts with different units: for example, a wire part can belong to one meta-part tracked in meters and another tracked in feet, so each project works with the unit that suits it.
Part Substitutes
Part substitutes provide a way to indicate that a different part can be used in place of the current one. Unlike meta-parts, part substitutes do not provide any stock grouping. The stock for each part is still managed independently.
Part substitutes are particularly useful for passive components, which often have functional equivalents that you don't necessarily want to manage as a single stock item. By defining part substitutes, you can indicate that another part can be used in place of the current one in every Project, BOM entry, and purchase list entry, globally.
BOM Substitutes
Sometimes, a part can be substituted for a specific BOM entry in a project, but not necessarily anywhere else. This is where BOM substitutes come in.
BOM substitutes allow you to define a substitute part for a specific BOM entry in a project. This substitution applies only to that particular BOM entry and does not affect the part's usage in other projects or BOMs.
Combining Substitutes
When building or purchasing, PartsBox combines information about all the above types of substitutes to produce a comprehensive list of all possible substitutes for a given BOM entry or purchase list entry.
Substitutes of every kind must share the part's unit category, so that quantities stay comparable. A part measured by length can only be substituted by another part measured by length, and a part counted in pieces only by another part counted in pieces.
By using meta-parts, part substitutes, and BOM substitutes, you can optimize your inventory management, reduce the risk of stock-outs, and ensure that your projects can be built even if a specific part becomes unavailable.
When viewing a part's information, the "used in projects" section shows all projects where the part is referenced — not only as the primary part in a BOM entry, but also where it appears as a BOM substitute or as a member of a meta-part used in a project. This can also be configured as a table column.
Default Storage Locations for Parts
Many parts have a dedicated "home" location where they should always be stored. PartsBox allows you to assign a default storage location to any part, which provides two benefits:
- Automatic pre-selection: When adding stock to a part with a default location set, that location will be automatically pre-selected in the storage location selector. This saves time and reduces the chance of accidentally storing parts in the wrong location.
- Mandatory enforcement: Optionally, you can mark the default location as mandatory. When enabled, stock for that part can only be added to the default location, preventing mistakes entirely.
To set a default storage location for a part:
- Navigate to the part's detail page
- Go to 'Settings'
- Select the 'Storage' tab
- Choose the default storage location from the dropdown
- Optionally, check 'Location is mandatory' to enforce the location
The default storage location dropdown only shows locations that can accept the part. Locations that are full, archived, or restricted (such as single-part locations already containing a different part) will not appear in the list.
When adding stock, if the part has a default location set, PartsBox will highlight this in the storage location selector. If the location is mandatory, other options will be disabled, ensuring the part goes to its designated location.
This feature is particularly useful for:
- Parts with dedicated bins or drawers
- High-value components that need controlled storage
- Parts that must be stored in specific environmental conditions
- Ensuring consistency when multiple people are adding stock
Part Attrition
In the process of assembling electronic devices using SMT (Surface Mount Technology) pick-and-place machines, a certain percentage of parts (components) will inevitably be lost or rejected. This is due to the inherent limitations and imperfections in the automated assembly process.
Furthermore, the mechanical design of tape feeders used in these machines requires a minimum length of tape, known as the "leader", to be present before the machine can automatically pick up parts from the tape. The parts contained within this leader tape are effectively unused and contribute to the overall part attrition.
Part attrition, also referred to as part wastage, is an important factor to consider when planning for production and managing inventory. Failing to account for attrition can lead to unexpected shortages and production delays.
PartsBox allows you to define attrition parameters for each part individually, ensuring that your inventory and order quantities account for these expected losses. When you use PartsBox to build or price Projects and BOMs, the application automatically takes the defined attrition parameters into account. It calculates the total number of components required based on the project's needs and the expected losses, ensuring that you have sufficient stock or order quantities to complete the build.
PartsBox provides two methods for specifying attrition:
- Percentage-based attrition: This parameter represents the percentage of components expected to be lost during the manufacturing process. Typical attrition rates range from 0.1% to 3%, depending on the component type and your production process specifics. For example, if you set the attrition percentage to 1% for a part, and your project requires 1000 units, PartsBox will calculate an additional 10 units to account for the expected loss.
- Quantity-based attrition: This parameter allows you to specify a minimum number of extra components that should always be reserved, regardless of the percentage-based calculation. This is particularly useful for components supplied on reels or tapes, where a certain length of leader material is required to feed the component into the placement machine. By setting a quantity-based attrition, you ensure you always have enough components to cover this minimum requirement. This amount is entered in the part's unit: a whole number for a part counted in pieces, or a fractional amount (for example, 2.5 m of leader) for a part with a unit of measure.
To set attrition parameters for a single part, navigate to the part's detail page and locate the attrition settings. You can enter the percentage and/or quantity values as needed.
If you need to set attrition parameters for multiple parts simultaneously, PartsBox makes it easy with the bulk editing feature:
- In the parts table, select the checkboxes next to the parts you want to modify. You can also use the selection checkbox in the table header to select all parts currently displayed in the table.
- Once you have selected the desired parts, open the 'Selection' menu and choose 'Set part attrition…'.
- In the attrition settings dialog, enter the percentage and/or quantity values that you want to apply to the selected parts.
- Click 'Apply' to update the attrition parameters for all selected parts.
Attrition cannot be set directly for meta-parts, which are used to group interchangeable components. When pricing projects that include meta-parts, PartsBox will use the maximum attrition values from all the individual parts within the meta-part. When building projects, the actual attrition will be calculated based on the specific part selected from the meta-part group at the time of the build.
Stock and Storage
Stock
After creating a part in PartsBox, you can add stock to represent the physical inventory of that electronic component. Stock represents the actual, tangible copies of the part that you have on hand or will have access to in the future.
Stock quantities are recorded in the part's unit of measure. For most parts this is a whole number of pieces, but a part measured by length, weight, or volume holds its stock in that unit — for example, 2.5 meters of wire or 500 grams of solder paste (see the Units of Measure section under Parts).
A single part can have stock in multiple locations. This is particularly useful when dealing with reels of components. Often, you may want to keep a full reel in one location while storing a smaller quantity on cut tape in another. Tracking stock across different locations also proves valuable when working with contract manufacturers, as it allows you to monitor inventory that is physically located outside your office.
PartsBox intentionally separates the concepts of parts and stock. You can think of parts as containers that may hold actual components (stock). Parts with zero stock serve important purposes:
- They indicate what needs to be ordered.
- They allow you to track pending orders.
- Your projects (BOMs) may use parts that you don't physically have in stock, but your manufacturer will.
- They allow you to import BOMs from CAD tools in the future, automatically matching BOM entries to parts.
PartsBox treats stock history as a permanent record with limited editing options. You can always remove the most recent entry, but older entries cannot be deleted, and their quantities cannot be modified. This approach ensures the integrity and traceability of your stock data over time.
Lots
In PartsBox, a lot represents a specific batch or shipment of electronic components, traceable to a known source. Lot control is an optional feature that allows for more detailed tracking and management of parts inventory.
When lot control is enabled, all stock for a given part is divided into distinct lots. A lot is created when adding new stock, ensuring that every batch of components is associated with a specific lot. This allows for differentiation between identical parts that may have been sourced at different times or from different suppliers.
For example, consider a 100nF capacitor where you have a full reel of 5000 pieces from one supplier and a strip of cut tape with 100 pieces from another. Without lot control, PartsBox only tells you that you have 5100 pieces in total — the two batches are indistinguishable. With lot control, the reel and the cut tape strip are tracked as separate lots, each with its own source, price, and history. You can see exactly how many pieces remain on the reel versus the strip, choose which lot to consume during a build, and trace any quality issue back to its specific source. A lot's quantity, price, and remaining amount are shown in the part's unit of measure: for a part measured by length, a lot might be a spool that started with 10 meters of wire, and PartsBox tracks how much length remains as you use it.
Lots can have various data associated with them:
- Name: A unique identifier for the lot, typically related to the source or date of acquisition
- Description: Additional details about the lot, such as supplier information or specific characteristics
- Comments: Notes about the lot that may be relevant for future reference
- Tags: Labels that can be applied to filter lots for display or when selecting part sources for builds
- Attachments: Relevant documents such as invoices, inspection reports, or test results
By using lot control, PartsBox enables precise tracking of parts throughout the inventory management process. This is particularly useful for managing parts with limited shelf life, ensuring traceability in case of quality issues, or complying with regulatory requirements.
When parts are consumed during a build or transferred between storage locations, the specific lot is recorded, maintaining a complete history of each lot's usage. This detailed tracking allows for easier identification and isolation of problems if they occur.
Lot control in PartsBox provides an additional layer of control and visibility over electronic components inventory, enabling more efficient and accurate management of parts.
Storage Locations
A storage location is a place where components can be stored. It can be a room, a drawer, a shelf, a box, a compartment within a box, or anything else you can think of.
Organizing your storage
The most important principle is: don't try to categorize parts by type. A common instinct is to put all resistors together, all capacitors together, and so on — but this creates constant reorganization work as your inventory grows, and it doesn't scale. Instead, let PartsBox keep track of where everything is. When a new shipment arrives, place parts wherever they physically fit. PartsBox will always tell you exactly where to find any part.
Here are some common approaches that work well in practice:
- Boxes by size: Keep a few boxes of different sizes. When parts arrive, place the bag or reel in whichever box has room and fits the package. A strip of cut tape goes in a small box, a full reel goes on a shelf or in a larger box. This is simple and efficient — you never need to rearrange anything.
- Per-project boxes: If you're working on several projects, keep a box for each active project with the parts you need for it. This makes it easy to grab everything for a build session. Parts not assigned to a project go into general storage.
- Compartmented boxes with grids: Small compartmented boxes (like those used for fishing tackle or craft supplies) work well for SMD parts on cut tape. Create each compartment as a storage location using the Grid method (e.g. 'b01-a1' through 'b01-d6') and place parts wherever there's a free compartment.
- Shelves for reels: Full reels don't fit in small boxes. A shelf or rack with labeled positions works well. Name positions like 's01-r1', 's01-r2', etc.
- Sample books: Resistor or capacitor sample books can be labeled as a single location each (e.g. 'book-r' for a resistor book), since it's easy to find a particular value within a book.
These approaches can be mixed freely. You might have a shelf for reels, a few compartmented boxes for cut tape and small parts, and a per-project box on your desk.
Naming scheme
You can name your storage locations anything you like, but here is a suggested naming scheme:
Start with a letter indicating the type of storage: 'b' for boxes, 's' for shelves, 'c' for cabinets, 'd' for drawers. A two-digit number follows for the specific unit. Then, if the location has sub-compartments, use a grid system: a1, a2, b1, b2, and so on. This results in names like 'b01-a4' (box 1, row a, column 4) or 's01-r3' (shelf 1, reel position 3). Use whatever scheme lets you easily find components.
Your storage location names can be changed at any time, but choose them carefully, as once you print labels, changing them becomes slightly more difficult.
Companies working with CM/EMS (contract manufacturers) often prefix some of their storage locations with the manufacturer's name, so that they can easily filter locations and see what the CM has in stock right now.
CM/EMS companies, on the other hand, often prefix some storage locations with customer names, to get per-customer storage locations for consigned parts.
Adding Storage Locations
To create a new storage location, navigate to the Storage section in the main menu and click on the 'Create' button. PartsBox offers four methods for creating storage locations:
- Single Location: This method is used to create a single storage location with a specific name. It is suitable when you need to add just one location, such as a single box or a shelf. Enter the desired name for the location and click 'Create'. You can also mark the location as being for a single part only.
- Row: The Row method is used to create a linear array of storage locations, labeled with numbers or letters. This is useful when you have a series of boxes or compartments arranged in a row. Specify the prefix for the location names, the starting and ending numbers or letters, and click 'Create'. For example, entering a prefix of "box", starting number of 1, and ending number of 5 will create locations named "box1", "box2", "box3", "box4", and "box5".
- Grid: The Grid method allows you to create a two-dimensional array of storage locations, using letters or numbers for rows and columns. This is handy for organizing storage in a grid-like structure, such as a shelf with multiple rows and columns. Enter the prefix, the row and column labels, and click 'Create'. For instance, with a prefix of "shelf", row labels of "A,B" and column labels of "1,2", the following locations will be created: "shelf-A1", "shelf-A2", "shelf-B1", "shelf-B2".
- 3D Grid: The 3D Grid method extends the Grid concept to create a three-dimensional array of storage locations. This is suitable for complex storage setups, like multi-level racks with rows and columns. Specify the prefix, the level, row, and column labels, and click 'Create'. As an example, a prefix of "rack", level labels of "1,2", row labels of "A,B", and column labels of "1,2" will generate storage locations such as "rack-1-A1", "rack-1-A2", "rack-1-B1", "rack-1-B2", "rack-2-A1", and so on.
After creating storage locations, you can assign parts to them, making it easy to track the physical location of your inventory. Storage locations can be renamed after creation to better reflect their contents or purpose. However, storage locations cannot be deleted. Instead, you can archive a storage location, which will hide it from view but still retain it (along with its history) in the database. This ensures that historical data about the location and its associated parts is preserved for future reference or auditing purposes.
Operations on Multiple Lots
For general information about selecting and operating on multiple items, see the Operations on Multiple Items section under Working with Data. The operations specific to lots are described below.
Similar to operating on multiple parts, you can perform operations on multiple lots. In the Parts section, select the Lots button to view the table listing all lots in your inventory. You can then select the lots you want to operate on and use the "Selected..." menu to:
- Move: Move all selected lots to a target storage location.
- Adjust stock counts: Change the inventory counts for selected lots to match physical inventory.
- Deselect all: Clear the current selection without performing any operations on the selected lots.
If you choose to move a smaller quantity than the full lot, the lot will be split, and PartsBox will ask you for additional information about the newly created lot. When splitting a lot that was created from a build, the new lot will display the original build information in the Builds tab, maintaining full traceability.
Lot management is available only in plans with the Lot Control feature.
Operations on Multiple Stock Batches in Storage Locations
For general information about selecting and operating on multiple items, see the Operations on Multiple Items section under Working with Data. The operations specific to stock batches are described below.
Even in plans without lot control, you can perform operations on multiple batches of parts. However, in this case, these operations can only be performed within a storage location.
To view parts stored in a storage location, go to the Storage section and select a storage location. Alternatively, expand a storage location row in the table to see the list of parts stored there. Select one or more parts and use the "Selected..." menu to:
- Move: Move all selected batches of parts to a target storage location.
- Adjust stock counts: Change the inventory counts for selected batches of parts to match physical inventory.
- Deselect all: Clear the current selection without performing any operations on the selected batches.
In plans with lot control, these operations will correctly track lots. If you choose to move a smaller quantity than the full lot, the lot will be split and PartsBox will ask you for additional information about the newly created lot.
Projects and BOMs
Projects
A project in PartsBox represents a Bill of Materials (BOM), which is a list of components required to build an electronic device or assembly. Each project corresponds to a specific design or product.
Projects serve multiple purposes in PartsBox:
- Building devices: When you're ready to manufacture a device, you can create a build from the project. This tracks the production process, manages stock levels, and ensures you have all necessary components available.
- Cost estimation: PartsBox calculates the price of a project's BOM, providing an estimate of the total component cost. This helps with product pricing decisions and production cost management.
- Sub-assemblies: Projects can represent sub-assemblies that will be incorporated into larger devices or systems. When you complete a sub-assembly project, the manufactured items become available as stock that can be used as components in other projects. This hierarchical approach supports management of complex products with multiple assembly levels.
Adding Parts to a Project
PartsBox offers several convenient methods for adding parts to a project, allowing you to efficiently populate your Bill of Materials (BOM). Here are the available options:
- Adding Multiple Parts from the Parts Table
- Navigate to the parts table, which displays a list of all parts in your inventory.
- Select the desired parts by clicking the checkboxes next to each part.
- After selecting all necessary parts, click on the 'Selection' menu above the parts table.
- From the dropdown menu, choose 'Add to project…'.
- A dialog box will appear, prompting you to select the target project from a list of existing projects and adjust the quantity for each part.
- Choose the appropriate project and click 'Add' to include the selected parts in the project's BOM.
- Adding a Single Part from the Part Info Screen
- Locate the specific part using the search or filtering options in the parts table.
- Click on the part to open the 'Part Info' screen.
- On the 'Part Info' screen, find the 'Add to project' button.
- Click this button to open a dialog box where you can select the target project and set the quantity.
- Choose the desired project and click 'Add' to include the part in the project's BOM.
- Adding a Part from the Project BOM Section
- Open the project where you want to add parts.
- Navigate to the BOM section of the project.
- Click the 'Add part' button within the BOM section.
- A dialog box will appear for searching and selecting parts.
- Use the search and filtering options to find the desired part.
- Click on the part to select it, then click 'Add' to include it in the project's BOM.
Working with BOMs (Bill of Materials)
Importing a BOM
PartsBox can import a BOM (Bill of Materials) from a number of CAD/eCAD packages, in CSV or TSV format. You can import BOM entries either by creating a new project, or into any existing project.
To create a new project by importing an existing BOM, use the 'Import' button in the 'Projects' section. This will prompt for the file to be uploaded. Upload a CSV/TSV file exported from your CAD program.
PartsBox will try to parse your BOM and display the preliminary results. Please adjust the 'Field separator' and 'Character encoding' options first until the BOM is correctly parsed and the first few example rows are shown. Please make sure that the 'First line contains column names' checkbox is correctly set for your BOM.
Afterwards, adjust the mapping from BOM columns to PartsBox BOM fields. There is a 'Guess' button which will use heuristics to make a best-effort guess at column mappings, but please always review the results carefully.
The imported BOM is shown below the column mapping table, once you map the required columns.
The available BOM field choices are:
- Quantity: quantity for the given line. When the matched part has a unit of measure, this can be a fractional amount in that unit; otherwise it is a whole number of pieces.
- Part: this is either the MPN or a name that describes the part (like 330R)
- Designators: one or more designators ('C1') of this BOM entry on the PCB. For parts counted in pieces, the number of designators should correspond to the quantity.
- Comments: any comments useful for understanding the BOM (informative only)
- Footprint/Package: the part footprint as understood by the CAD program (informative only)
- Part ID Anything™ code: used for automatically matching BOM entries to parts using ID Anything™
- Part CAD Key: used for automatically matching BOM entries to parts using CAD keys
- Do Not Populate (DNP): if not empty, will set the DNP flag for this BOM line
- Custom Field...: maps a CSV column to an entry custom field. When selected, a second dropdown appears where you can choose an existing custom field name or type in a new one. Values from the CSV column will be stored as custom fields on the imported BOM entries.
- Ignore: do not process this column in any way
To save time on future imports, you can save your column mapping settings as a preset for quick access later.
Matching BOM Entries to Parts
After importing a BOM into PartsBox, each line that represents a part has to be matched to a specific part that has already been created. There is no way to automatically create parts while importing a BOM because of ambiguity and potential costly mistakes: there are many parts with the same name. The matching can be done automatically if the parts have already been created in several ways that are tried in order:
- ID Anything™ match: if the Part ID Anything™ column was imported with the ID Anything™ codes of the parts, and the ID Anything™ code points a part in the database, the entry will be matched.
- CAD key match: if the 'Part CAD key' column was imported and there is a match between the CAD key in the BOM and a CAD key in one of the parts in the database, the entry will be matched.
- Part name match: if the 'Part' column matches either the local name or the MPN of exactly one part in the database, the entry will be matched. If there are multiple name matches but exactly one of them is a meta-part, the meta-part will be preferred.
It is highly recommended to store either ID Anything™ codes or CAD keys in the CAD part database and export those in the BOMs to get quick and precise matching.
Entries which have not been matched to parts will be highlighted. For those entries, you can either create additional parts and retry the matching (see below), or open each of the entries and do the matching manually, possibly also creating a new part in the process. It is also possible to un-match the entry if you made a mistake.
To retry the matching, you can select some or all entries in the BOM and use the 'Selected | Match entries' menu option. This will retry the matching for all selected entries. You can also un-match multiple entries if needed.
Non-Part Entries
BOM entries are not limited to parts, and can also represent services or labor, like PCB assembly, testing, or packaging. These entries can have offers attached just like parts, which allows for estimating the entire cost of production, not just the cost of parts. Offers for service/labor BOM entries are similar to part offers: multiple price breaks, MOQs, and expiration dates are supported, and offers can be entered in any supported currency.
BOM Error Checking
BOM entries are checked for correctness, to help avoid mistakes and to allow structural BOM editing. For entries that have designators, the quantity must match the number of designators. For example, a BOM entry with a quantity of 2 and designators C1, C2 is correct, but a quantity of 2 and a single designator C1 is likely a mistake. PartsBox displays warnings when this happens, and this will also make merging BOM entries with these mistakes impossible. Entries with no designators are not checked, so BOMs that do not use designators do not produce warnings. This also covers parts with a unit of measure: a measured quantity, such as a length of wire, is normally entered without designators.
Quantities are also checked against the matched part's unit. A part without a unit of measure is counted in whole pieces, so when an entry with a fractional quantity is matched to such a part, PartsBox warns and offers to round the quantity to a whole number, or to unmatch the part.
Merging and Expanding Entries
If multiple entries are matched to the same part, it usually makes sense to combine them into a single entry, adjusting the quantity and designators accordingly. This is what the 'Selected | Merge entries' option is for. If you select several entries that refer to the same part, you can merge them into a single BOM entry.
It is also possible to expand BOM entries. A BOM entry with a quantity greater than 1 can be expanded into individual entries, each with a quantity of 1. As an example, if there is an entry with RC0805FR-0710KL, a quantity of 3, and designators R1,R2,R3, it can be expanded into three entries:
RC0805FR-0710KL, quantity of 1, designatorR1RC0805FR-0710KL, quantity of 1, designatorR2RC0805FR-0710KL, quantity of 1, designatorR3
This is useful if you'd like to edit one of the entries individually or exclude it from builds. To expand, click the 'Expand entry' button when editing a BOM entry, or select multiple entries and use "Selected | Expand entries...". Expanding is available only for parts counted in pieces with a whole-number quantity. It is not offered for a part that has a unit of measure, because individual designators do not apply to a continuous material.
The reverse operation is also possible: it is possible to select several BOM entries with the same part, and use the 'Selected | Merge entries...' menu option. This will merge the selected entries into a single BOM entry, combining designators.
When merging BOM entries, an AND operation is performed on BOM substitutes: the intersection of sets of BOM substitutes of selected entries becomes the set of substitutes of the merged entry.
At the bottom of the BOM there might be a warning about multiple BOM lines referring to the same parts. This is not a problem, PartsBox just offers a convenient way to perform the 'Merge' operation on the entire BOM. If you click 'Merge all', all instances of multiple BOM lines referring to the same part will be processed and merged.
BOM Substitutes
When editing a Bill of Materials (BOM) in PartsBox, you have the flexibility to add part substitutes for individual BOM entries. This feature allows you to specify alternative parts that can be used interchangeably with the main part. When building, pricing, or purchasing, PartsBox treats the main part and all its substitutes as equally valid choices, giving you greater flexibility in sourcing components.
BOM substitutes function similarly to member parts (substitutes) in meta-parts and substitutes for individual parts. However, there is a key difference: BOM substitutes are configured on a per-entry basis within a specific project and have no effect outside of that particular entry. This granular control enables you to tailor substitutes to the specific requirements of each project.
When combining BOMs for purchasing, PartsBox takes a conservative approach to handling substitutes. If there are two entries for the same part but with different sets of substitutes, PartsBox will only consider the intersection of substitutes — that is, the substitutes that are common to both entries. This ensures that only substitutes that are universally applicable to the part across all instances are used in the purchase list. To illustrate this, let's consider an example. Suppose you have one BOM where Part A has substitutes B and C, and another BOM where Part A has substitutes B and D. In this case, PartsBox cannot assume that Part A can always be substituted with B, C, or D. Instead, PartsBox will only be certain that Part A can be substituted with B, as it is the only common substitute across both BOMs.
Handling Altium Designer® CSV Export Bugs
Certain versions of Altium Designer are known to have issues with handling double quotes (") in the CSV files they generate. Specifically, these versions fail to correctly escape double quotes within field values. For instance, if a field contains a value like 0.156", the resulting CSV file will not adhere to the standard CSV formatting rules, rendering it problematic for further processing or importing.
To address this issue, users encountering problems with their CSV files due to unescaped double quotes have a couple of manual correction options:
- Remove Double Quotes: One approach is to open the generated CSV file in a text editor and manually delete the double quotes from within the fields.
- Double Up Double Quotes: Another method is to prefix each double quote within a field with another double quote. According to the CSV standard, this signifies that the double quote is part of the field value and not a delimiter. This method preserves the original data while making the CSV file compliant with expected formatting standards.
Consider checking for software updates or patches from Altium that might resolve this issue in future releases, reducing the need for manual file adjustments.
Offers
Offers from suppliers/distributors can be attached to parts, to be used when pricing projects that require the part. Offers can have multiple price breaks, as well as validity periods (expiration dates), minimum ordering quantity (MOQ) and order multiples.
An offer's prices, minimum order quantity, and order multiples are expressed in whole vendor packages — whatever the vendor sells as a single item, such as a spool or a reel. PartsBox compares offers by their price per part unit, so offers with different package sizes or units can be ranked against each other (see Pricing Projects below).
Pricing Projects
Estimating the cost of a project is an important step in the production process. PartsBox simplifies this task by providing a comprehensive pricing feature. To access this functionality, navigate to the project you wish to price and select the 'Pricing' tab.
Upon opening the 'Pricing' tab, you will be presented with the main pricing table, which displays a detailed breakdown of the project's components and their associated costs. This table includes information such as the part name, manufacturer, MPN (Manufacturer Part Number), quantity required, and the price per unit for each component. For a part with a unit of measure, the price per unit is the price of one part unit (for example, $0.14/mm), with the unit symbol shown next to the price.
Pricing Options
Build/batch size is the number of complete units (boards) that you want to estimate pricing for. It is a multiplier applied to every line quantity: at a build size of 10, a line that needs 2.5 m of wire requires 25 m. Several common quantities are provided for quick access, but any quantity can be entered in the input box.
Total per-unit price and total price are displayed in large type on the right side. The unroll button next to them allows for quickly comparing pricing for the whole range of common build quantities, without entering them manually.
If there is a red exclamation mark warning sign next to per-unit and total price, it means that PartsBox was unable to calculate the pricing, because some information was missing. The problematic parts are highlighted in red in the pricing table below.
Part sourcing options allow for choosing where the parts come from. 'Only local stock' will only consider the parts you already have, using their average purchase price for BOM pricing. 'Only buy' will ignore local stock and only use online prices and stock information. 'Use local stock, then buy' will first use up all local stock, and then if it isn't enough, consider online offers.
Note that if your stock history does not contain prices, you will not get correct pricing information if you try to use local stock in Project/BOM pricing. You can always go back and edit the stock history in order to add prices.
Offer filtering options allow narrowing down the list of offers:
- 'Preferred distributors only' checkbox will exclude offers from distributors that are not on your preferred list (one rarely buys from distributors on the other side of the globe). You can modify the list of preferred distributors in Settings.
- 'Authorized distributors only' will only consider offers from distributors who are authorized by the manufacturer to resell a part.
- 'In-stock only' will only consider offers where the distributor said the part is in stock.
- 'Check stock levels' goes a level deeper, and actually checks the number of parts that the distributor has in stock. Some distributors do not provide exact in-stock information, so checking this will exclude their offers.
Pricing Table
The pricing table is the central component of the BOM pricing feature in PartsBox. It provides a comprehensive overview of all the parts in a project, along with their pricing information and sourcing options. This table enables you to make informed decisions about purchasing components for your project.
Key columns in the pricing table include:
- Batch Quantity: This column shows the total amount of the part required to build the chosen quantity of the project, shown in the part's unit. It takes into account the attrition parameters set for each part, so it may be higher than the bare requirement, to account for expected losses during production.
- Purchase Quantity: This column shows the amount you need to buy for this entry after accounting for the sourcing options, shown in the part's unit. For a part sold in packages, it is rounded up to whole packages (a demand of 1 in for a part sold in packs of 12 shows as 12 in). For example, if 100 pieces are needed but you have 25 in local stock and chose 'Use local stock, then buy if needed', the Purchase Quantity is 75. It is empty when the entry's candidate parts use different units or package sizes, because then the amount to buy depends on which offer is chosen.
- Best Offer: PartsBox automatically selects the best offer for each part based on your preferences and vendor rules (see the Vendor Rules section below). This column displays the currently selected best offer.
The pricing table provides the ability to 'lock' a particular offer for a part using the padlock icon. When an offer is locked, it will be used to calculate the overall BOM price, regardless of any changes in pricing or availability.
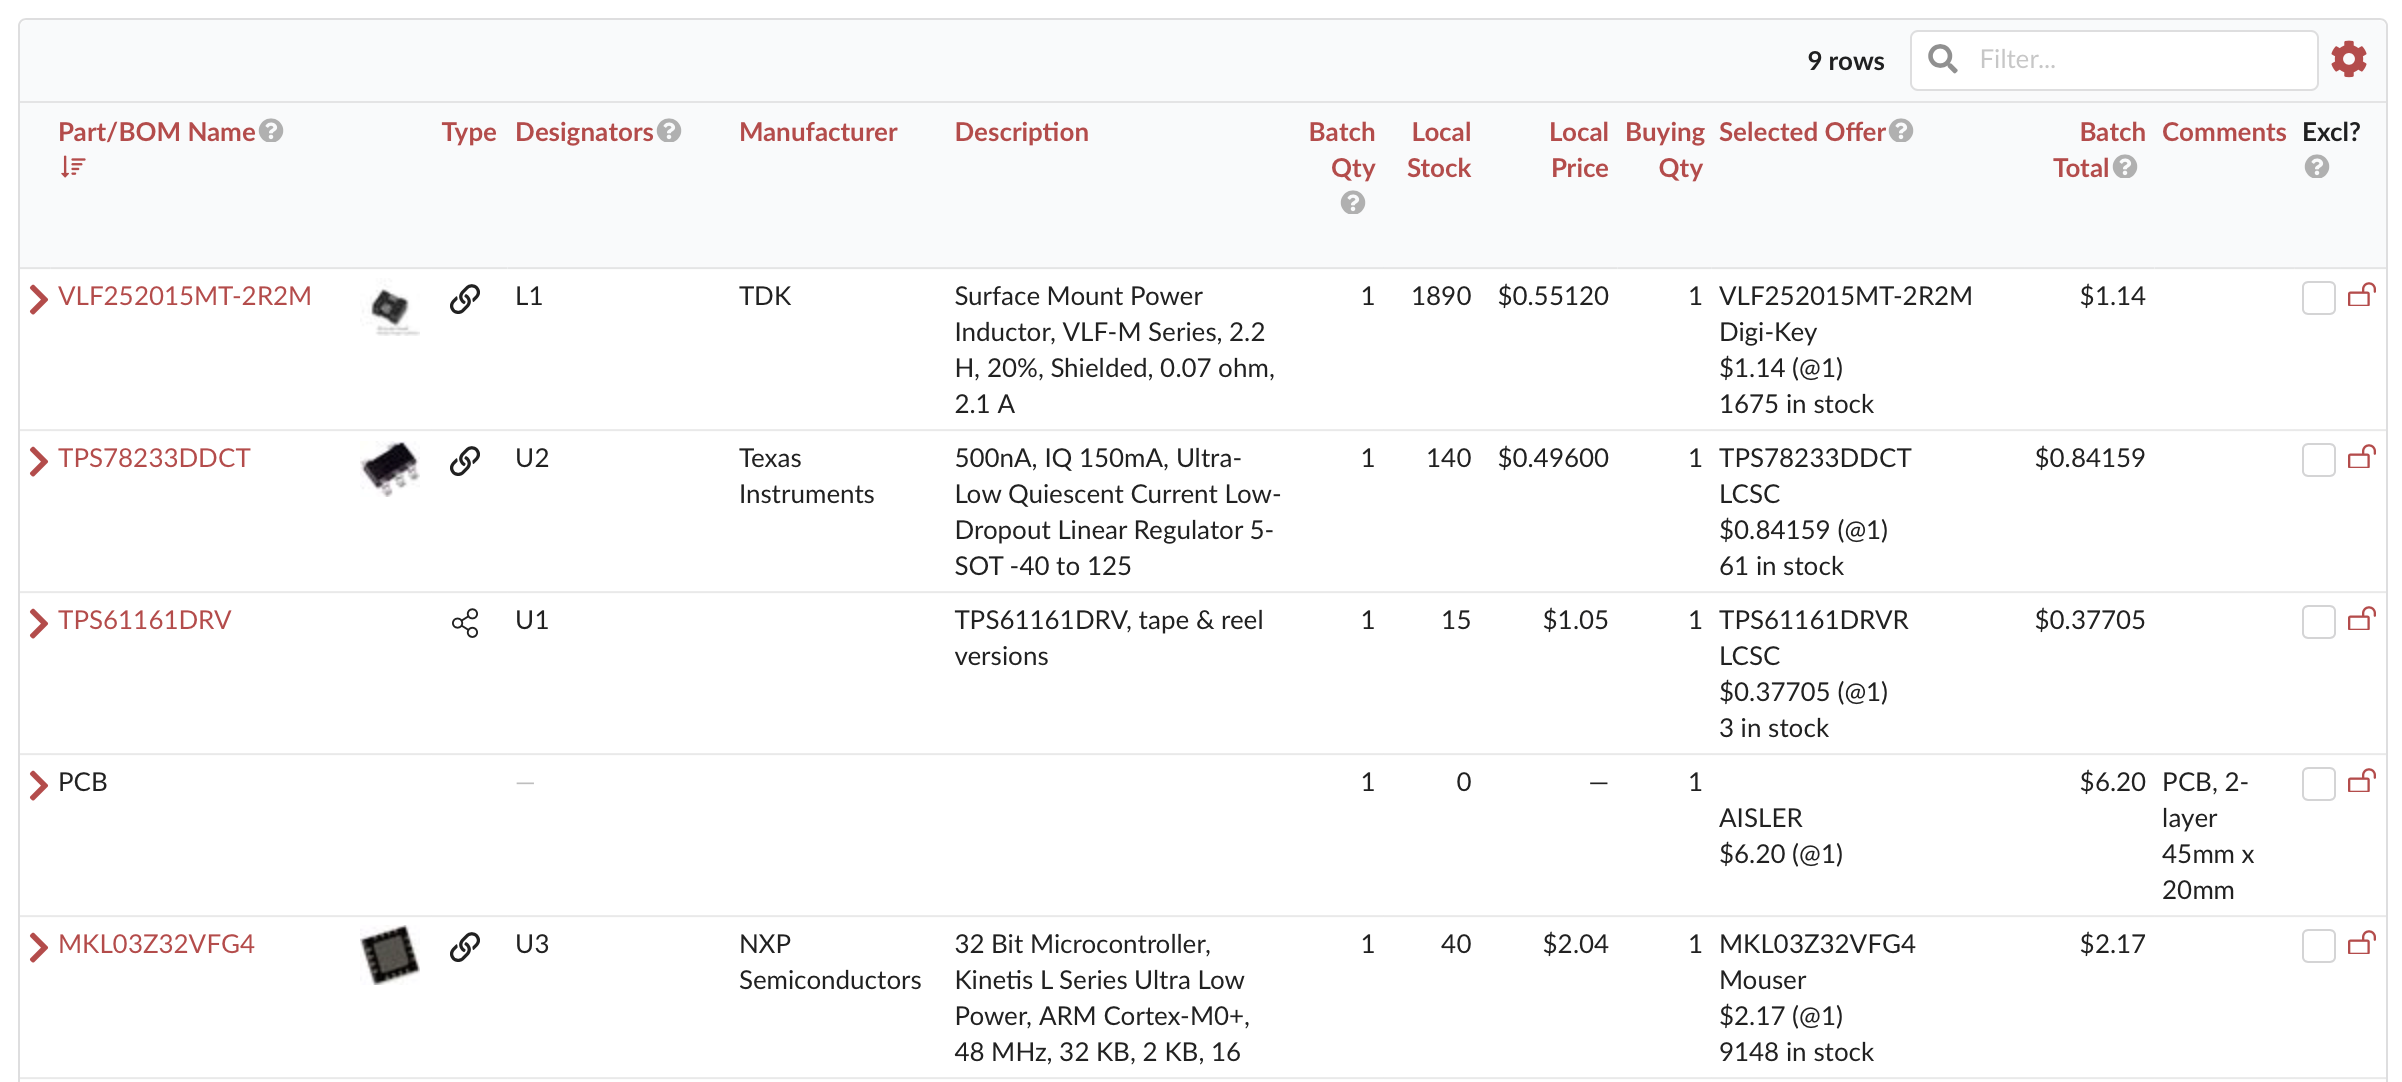
Each row in the pricing table includes an 'exclude' checkbox, allowing you to quickly exclude a part from pricing calculations. This is useful when you want to see the impact of removing a particular component from your BOM.
To view more details about the available offers for a specific part, you can expand the row using the chevron icon on the left side. This will display a list of all the offers for that part, including pricing, quantity breaks, and lead times.
Offer Selection
PartsBox automatically selects the best (least expensive) offer for each BOM entry linked to an online identity (Manufacturer Part Number). With typically 20-40 offers available for each part, the selection process is complex, taking into account various factors:
- Price breaks, which vary for each offer
- Availability and stock information
- Minimum Order Quantities (MOQs)
- Order multiples
- Multiple currencies
The main BOM pricing table displays only the best offer for each part. PartsBox selects this offer based on the 'Effective Price' — the price paid assuming any excess inventory purchased will be discarded. This approach ensures the most cost-effective option is chosen, even if the required quantity is below the MOQ or not a multiple of the order multiple.
For example, if 50 parts are needed but the MOQ is 100, PartsBox will consider the price for 100 parts, assuming the excess 50 will be discarded. If this price is still competitive due to price breaks, it may be selected as the best offer. It is paradoxically sometimes less expensive to buy more. Similarly, quantities are rounded up to the nearest order multiple for comparison.
For a part with a unit of measure, each offer shows its price two ways. The Price per Package and Effective Price per Package columns give the price of one vendor package, such as a spool or a reel. The Price per Unit and Effective Price per Unit columns give the price of one part unit, with the unit symbol shown (for example, $0.14/mm). The 'Effective' columns assume any excess you must buy is discarded. To rank offers, PartsBox reduces all prices to a common unit, which lets it compare offers across substitutes even when they are sold in different units or package sizes.
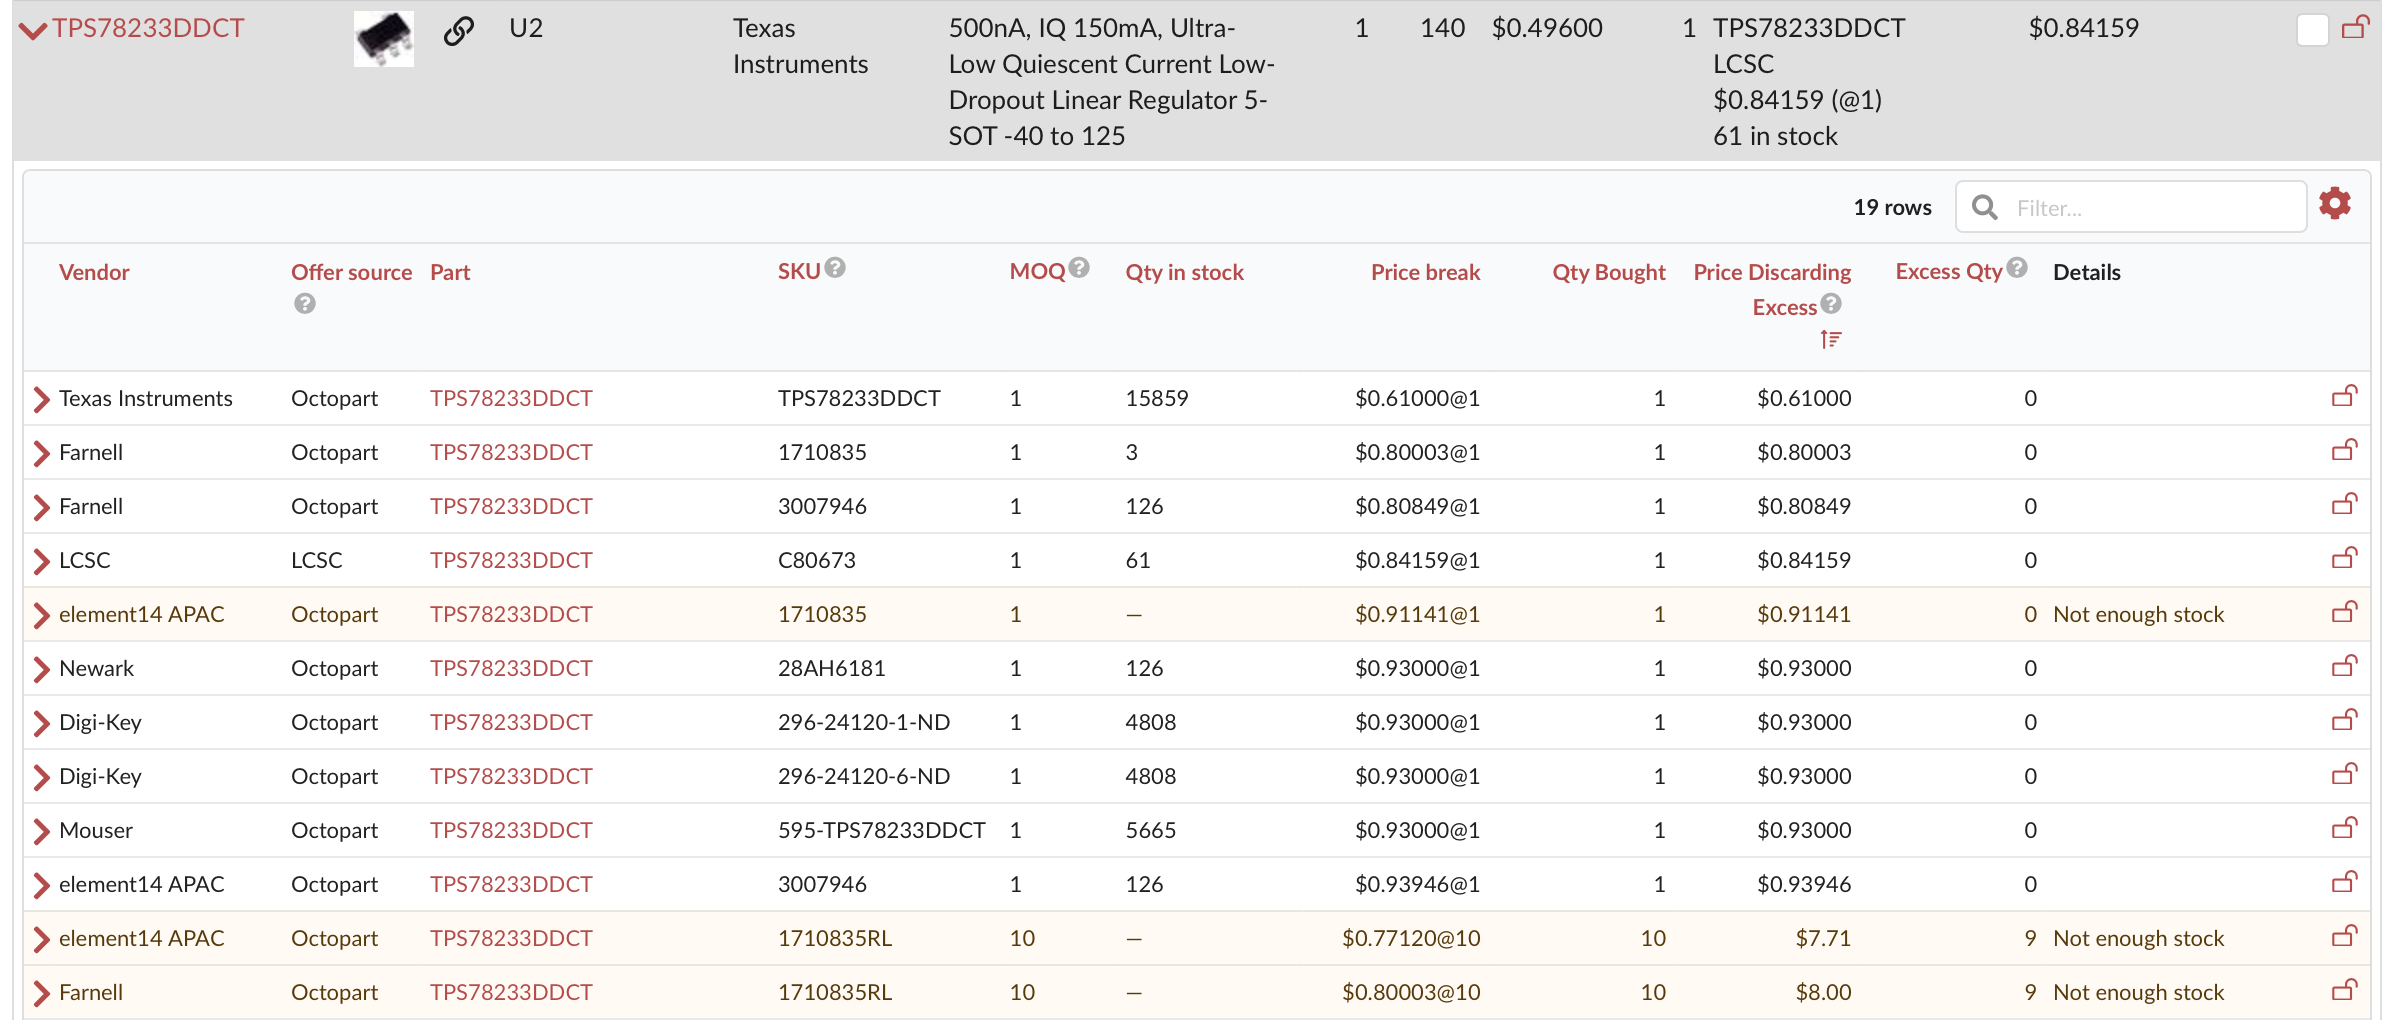
The ranking of offers, and thus the best offer, changes based on the build quantity. This allows the discovery of new, unexpected part sources that become cost-effective at certain quantities.
Expanding each offer reveals additional details:
- Packaging
- Quantity on order
- Estimated time of arrival (ETA) for orders
- Factory lead time
- Factory order multiple
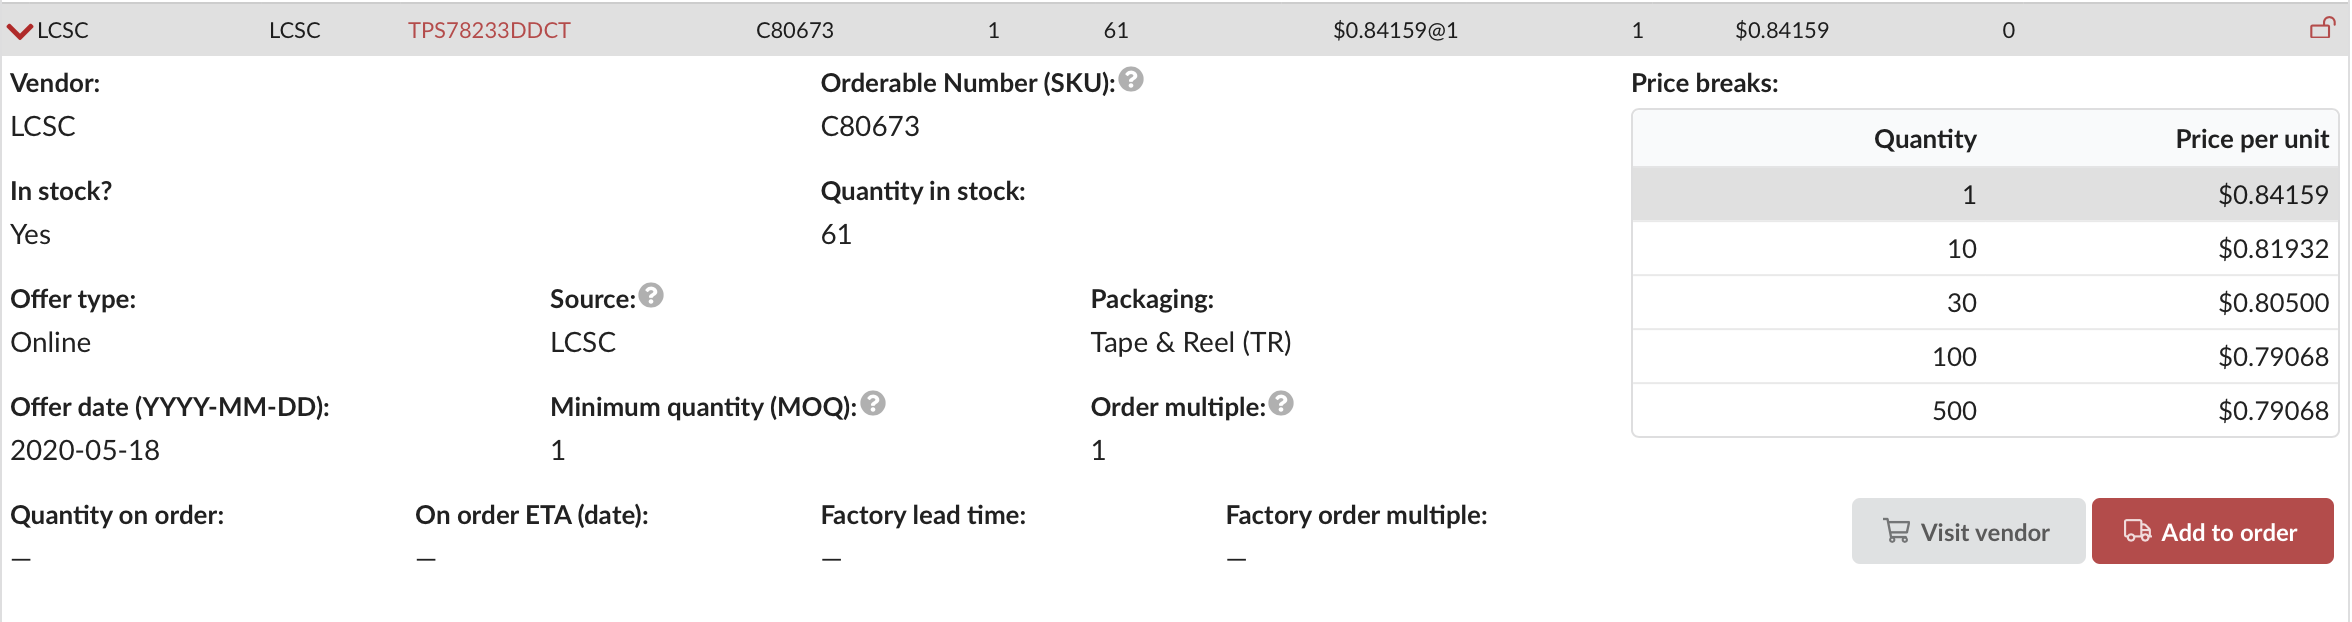
For meta-parts, BOM substitutes, or part substitutes, offers are gathered for all grouped parts. As these parts are considered interchangeable, the offers are combined and the best one is selected from the entire pool.
Adding Local Offers for Custom Pricing and Discounts
In addition to sourcing components from major distributors, it is common to receive custom offers from other suppliers for specific quantities, often with discounted pricing. PartsBox accommodates this by allowing you to enter your own local offers, which are then considered and ranked alongside online offers during the pricing process.
Local offers can be added in two ways:
- Directly from within the project pricing table
- From the part info screen for a specific part
Like online offers, local offers support multiple price breaks at any quantities, as well as a minimum order quantity (MOQ) and order multiple. These parameters are taken into account by the pricing algorithm when determining the best offers for a given project.
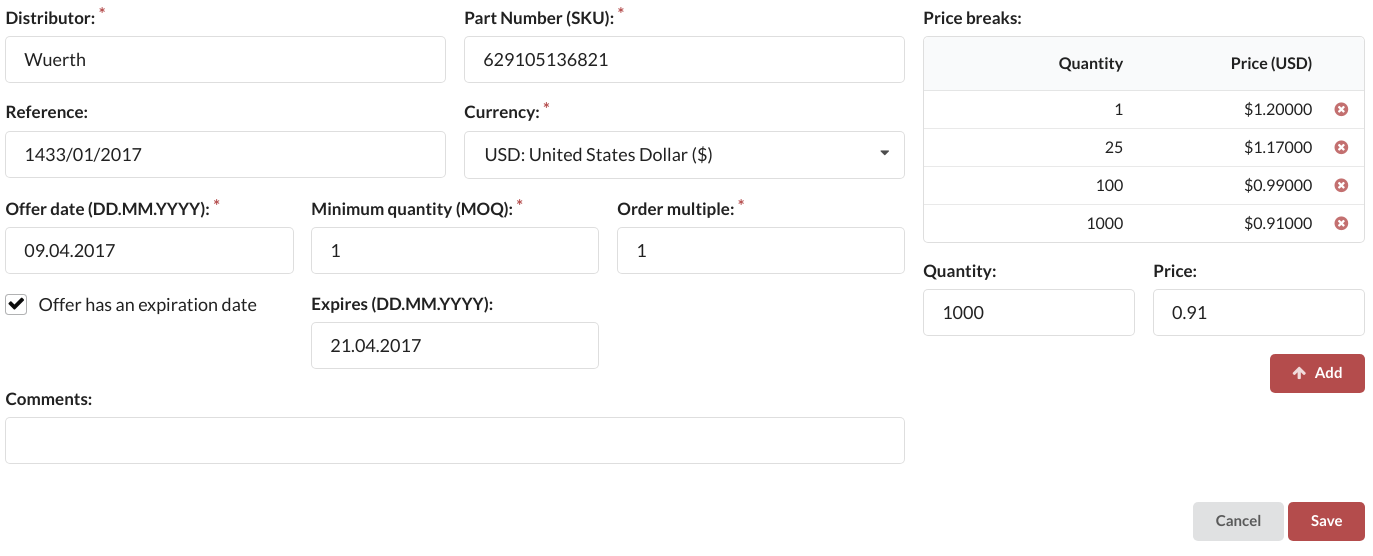
When adding a local offer, you can provide additional information such as:
- Order reference or number
- Offer date
- Comments
- Expiration date
The expiration date is particularly important, as PartsBox will automatically exclude any offers that have expired from consideration during pricing. An offer will not be considered if it has expired.
After creating a local offer, you can attach files to it by clicking on the offer and using the attachments section. This is useful for storing quotes, email correspondence, or any other documents related to the offer.
PartsBox supports all major currencies for local offers. It converts prices to your preferred display currency using up-to-date exchange rates, while preserving the original prices and currency for reference. This allows you to work with offers from various suppliers around the world without manual currency conversions.
Currency Handling
PartsBox simplifies currency handling. Users can select their preferred currency in the settings, and all prices will be displayed in that currency throughout the application. This allows for a consistent and personalized experience when working with pricing information.
The software uses European Central Bank (ECB) exchange rates for accurate currency conversion. These rates are regularly updated. This eliminates the need for manual currency conversions and provides users with up-to-date pricing information.
When entering offers manually, you can choose from any of the supported currencies. PartsBox will handle the currency conversion automatically, displaying the prices in the user's preferred currency. This feature accommodates offers from various suppliers and regions, making it easy to compare and analyze pricing data.
Exporting Pricing as PDF
The pricing table can be exported as a PDF document using the Export button in the table footer. The exported PDF includes project information (name, description, dates), a price-vs-quantity summary table showing per-unit and total prices for preset build quantities, the currently selected build quantity with its per-unit and total price, and the full pricing detail table with all components and their sourcing information. If a company logo has been uploaded (see the Organizations and Access section), it is included in the PDF header.
Vendor Rules
Vendor rules control which distributors and vendors are considered when PartsBox selects the best offer for BOM entries. By organizing rules into named rule groups, you can create flexible sourcing strategies — for example, preferring certain vendors and falling back to others if they don't have stock. Rule groups can be applied globally or locked to specific projects and purchase lists.
Creating and Managing Rule Groups
To configure vendor rules, navigate to Settings and select 'Vendor rules'. From there, you can:
- Add group: Create a new rule group with a name and optional description.
- Delete group: Remove a rule group that is no longer needed.
- Make default / Clear default: Set or clear a rule group as the global default. The global default is used everywhere unless overridden at the project or purchase list level.
Managing vendor rules requires the 'Modify vendor rules' permission.
Configuring Rules Within a Group
Each rule group contains an ordered list of rules. Rules can be added, removed, and reordered using the up/down arrows.
Every rule has a Buy from setting that determines which vendors are considered:
- Any vendor: No vendor restriction — all offers are considered.
- Local offers only: Only manually-entered local offers are considered.
- One of these vendors: A whitelist — only offers from the selected vendors are considered.
- Any vendor except: A blacklist — offers from the selected vendors are excluded.
Each rule can also have an optional Rule name/comments field for documentation purposes. The vendor list is populated from vendors that have active offers in your database.
How Rules Are Processed
Rules within a group are processed top-to-bottom:
- The first rule is applied to the available offers. If it produces any matching offers, those are used — processing stops.
- If a rule matches nothing, the next rule is tried.
- If all rules fail to produce any matching offers, no offers are selected and the entry shows as unpriced.
This creates a fallback chain. For example, a rule group with three rules could implement the following strategy:
- Rule 1 — Buy from LCSC or TME (preferred low-cost vendors)
- Rule 2 — Buy from Mouser (fallback)
- Rule 3 — Buy from any vendor (last resort)
If LCSC or TME have matching offers, those are used. Otherwise, Mouser is tried. If Mouser has no offers either, any available vendor is accepted.
Using Vendor Rules in Projects and Purchase Lists
The vendor rules selector appears in the project Pricing tab and in purchase lists. It lists all available rule groups, with the global default annotated as '(Global default)'. Selecting 'No rules (everything accepted)' disables vendor filtering entirely.
Because switching between rule groups is instant, they also work as buying scenarios. You can define several groups representing different sourcing strategies and quickly switch between them to compare how each one affects BOM pricing before committing to a purchasing decision.
Use the Lock button to fix a specific rule group to a project or purchase list. A locked rule group (shown as '(Locally locked)') stays in effect for that project or list regardless of changes to the global default. Use Unlock to return to following the global default.
The vendor rules selector also appears in individual part pricing views, allowing you to see how different rule groups affect offer selection for a specific part.
Purchase Lists
A purchase list is a consolidated list of parts required to build one or more projects, based on the Bill of Materials (BOM) for each project and the specified build quantities. It represents the components you need to order to complete your planned builds.
To create a purchase list, you add projects to your shopping cart, specifying the quantity of each project you intend to build. PartsBox then combines the individual BOMs, multiplying the component quantities by the build quantities, and merges them into a single list. This process de-duplicates common components across projects, resulting in a unified list of all the parts you need to purchase.
The purchase list provides a clear overview of your purchasing requirements, making it easier to manage your inventory and plan your orders. It takes into account the current stock levels in your inventory, indicating which parts need to be ordered and in what quantities.
Order quantities in the purchase list can be edited directly. This is useful for adjusting quantities to meet minimum order quantities (MOQs), take advantage of price breaks, or round up to full reel quantities.
Once you have reviewed and finalized your purchase list, you can proceed to create vendor orders directly from the list. PartsBox helps you select the best vendors based on your preferences, such as price, availability, and lead time. You can split the purchase list into multiple vendor orders if needed, optimizing your purchasing process and reducing costs.
Production
Builds
A build represents the result of building a project. It normally corresponds to a batch of devices that have been manufactured, or are being manufactured. PartsBox supports single-stage and multi-stage builds, and a multi-stage build can be in-progress (not completed yet).
Building Projects
Builds are an essential feature in PartsBox for planning and tracking production. They allow you to check if you have sufficient quantities of parts (including attrition), prepare your build, generate a pick list, and remove the quantities used from your stock.
Builds also provide traceability. Depending on your subscription plan, the build history shows which specific parts were used in each build, with varying levels of detail.
To access past build history, view in-progress multi-stage builds, or start a new build, navigate to the 'Builds' tab within a project.
When starting a new build, the build table displays all project parts along with their required and available quantities. For plans that support part attrition calculations, the necessary quantity includes the attrition overhead, calculated individually for each part based on its attrition settings. When attrition is applied, the Required column displays the breakdown in the format "15 (12+3)", showing the total required quantity followed by the base quantity and attrition overhead in parentheses.
For Production plans and higher, you can disable attrition calculations for a build using the "Disable attrition?" checkbox in the build settings. When disabled, the exact quantities from the BOM will be used without adding extra parts for attrition. You can also override this setting for individual BOM entries by expanding the entry row and adjusting the attrition setting for that specific entry.
The 'Stock requests' column indicates where parts will be sourced from. For parts stored in multiple locations, parts with lot control, and meta-parts, this column may show multiple sources.
You can set the planned build quantity by entering a number or using the +/- buttons. Adjusting the quantity instantly updates everything. If there is insufficient stock for a component, that row will be highlighted in red with a warning.
PartsBox uses various strategies when fulfilling demand:
- FIFO (First-In First-Out): uses the oldest lots (sorted by acquisition date) first
- LIFO (Last-In First-Out): uses the most recent lots (sorted by acquisition date) first
- Last accessed: uses the most recently accessed lots first
- Largest lot first: uses lots with the most components first
- Smallest lot first: uses the smallest lots first
You can also restrict PartsBox to use only a single part source for each BOM entry. Some plans are limited to a single source, and in other plans, it can be useful to ensure full traceability.
The default part source selection strategy determines the initial assignments, but these can be changed in the table. Each row can be expanded to show sources, allowing you to select them individually and reorder them (subject to plan limitations). You can also override the quantity used on a per-entry basis.
Each row includes an 'Exclude?' checkbox. Checking it will exclude the part from the build (essentially a DNP - Do Not Populate). No stock will be removed for excluded parts.
If there is insufficient stock for some BOM entries, PartsBox will display a warning but still allow you to proceed with the build. This can be useful if you have additional stock on hand that hasn't been entered into PartsBox, or if you want to produce partially populated boards. The maximum available quantity will be removed from your stock.
Single-stage Builds
In single-stage builds, pressing the 'Build & remove stock' button (and confirming) will remove stock for all non-excluded parts belonging to the project. The build will then be marked as completed.
Multi-stage Builds
For multi-stage builds, check the 'multi-stage build' checkbox. PartsBox will display selection checkboxes next to each part in the build. You can use the individual boxes to select rows, select/deselect all rows, and use the search/filtering interface to mark parts to be built/placed in the current stage. The filtering interface supports tags, so entering '#smd' is a quick way to select all SMD elements, which are often placed first.
Pressing 'Build & remove stock' will process only the selected entries (same as in single-stage builds).
Performing a build stage without selecting any parts can be useful for documenting a processing step in the build history.
An incomplete multi-stage build will appear in the 'In-progress' tab of the Builds interface. Selecting it allows you to build the next stage or finish the build, marking it as complete.
A build can have any number of stages. It can also be marked as finished even if not all parts have been placed. In that case, unused entries will be marked as excluded in the build.
A multi-stage build is represented by the same ID Anything™ code throughout all stages, allowing ID Anything™ labels to be attached even to incomplete devices for quick identification and access to build information.
Build Configuration History
When managing production, it is important to maintain a record of build history. This record typically includes information such as the number of units built for a project or BOM, the date and time of the build, and any relevant comments. While this level of detail is sufficient for simple production runs, more complex builds often require additional data to be tracked.
In real-world scenarios, each build has its own unique configuration. This configuration includes supplementary information, including:
- Components that were excluded or marked as 'do not populate' for the specific build
- Stock requests generated from the build, detailing which parts were used from specific locations, or in the case of lot tracking, the exact lot (identified by serial number) used for the production run
PartsBox stores all of this information as part of the build history, allowing you to easily review and verify how a particular build was configured at any point in the future.
To access the build configuration history, navigate to the 'Builds' tab within the Projects section of PartsBox. Here, you will find a list of all builds. You can choose to view the complete list or filter it to display only completed builds or multi-stage builds that are currently in progress.
Each build is assigned a unique ID Anything™ code, which can be printed on a label and affixed to the physical devices produced during that build. This code provides quick and convenient access to the build information, ensuring that you can retrieve the relevant details whenever needed, even long after the build has been completed.
Viewing Stock Used
When viewing a completed or in-progress build, the Stock Used tab in the left navigation shows the stock that was consumed during that build. The Stock Used table serves two purposes: first, it shows what was used or consumed in a build and how much it cost; second, it allows you to manage the lots displayed in the table — for example, move them to a different storage location, adjust their stock counts, or tag them.
The level of detail available depends on whether lot control is enabled. Without lot control, stock for a part in a given storage location is fungible — there is no concept of a lot that can be individually tracked or managed. As a result, it is not possible to see the exact cost of parts consumed in a build, nor to manage the consumed stock directly from this view.
For plans without lot control, the Stock Used table displays part names, quantities used, designators, and storage locations. This provides a summary of what was consumed.
For plans with lot control, the Stock Used table provides full detail. The default columns include part name, lot name, quantity used, cost, designators, storage location, and the current remaining quantity in each lot. Cost tracking shows the total cost of consumed stock, calculated from the unit cost of each lot. You can expand each row to see full lot details.
The lot control variant also supports bulk operations on the consumed lots:
- Add/remove tags: Organize consumed lots with tags
- Set/rename/delete custom fields: Manage custom field values across selected lots
- Move: Relocate lots to different storage locations
- Adjust stock counts: Modify lot quantities after recounting
To use bulk operations, select lots using the checkboxes, then choose an operation from the menu.
Kitting
Kitting moves all the parts needed to build a project into a single staging location in one batch operation, instead of moving them line by line through the BOM. Choose Kit parts in the project's Builds tab, enter the build quantity, and select the target staging location. PartsBox computes the required quantities using the same logic as builds: attrition is applied, and substitutes and meta-parts resolve to the concrete parts you have in stock. Stock already in the staging location counts as available and is not moved.
The preview table shows the status of every BOM entry: Full (all required stock is available), Partial (only some), or None. You can configure each entry before kitting — pick specific sources, exclude the entry, or override its quantity — using the same controls as the build table. Source ordering (FIFO by default) and source filtering are also available. When some parts are missing, you can still kit the available stock; the shortfalls are reported.
Before confirming, PartsBox shows two views of the kit. They differ because the same physical part can be used in several BOM entries (directly, through substitutes, or through meta-parts). The pick list combines such entries into a single row: it has one row per stock source (part, location, and lot), sorted by storage location, so each location is visited once, and every row carries the designators of all BOM entries drawing on that stock. The build worksheet keeps one row per BOM entry, for use during assembly. Both views can be checked off on screen and exported to PDF with a check-off box on every row.
Kitting only moves stock: it does not consume anything and does not create a build record. Each move is recorded in stock history as a linked pair of entries. After kitting, you can start a build with a source filter restricted to the staging location, so the build consumes exactly the staged parts.
Kitting is available in the Production plan and higher.
Using Sub-assembly Parts
Sub-assembly parts in PartsBox represent the stock resulting from building projects. When a project is built, the stock of the corresponding sub-assembly part is incremented by the build quantity. This allows complex products consisting of multiple sub-assemblies and parts to be managed effectively, with each sub-assembly produced or sourced separately.
To create a sub-assembly part for a project:
- Navigate to the project's info screen.
- Click the 'Create Sub-assembly Part' button. This action only needs to be performed once per project.
After creation, the sub-assembly part will appear in the parts list and can be managed like any other part, with one exception: the name of a sub-assembly part is always the same as the corresponding project and cannot be changed.
When building a project, the build confirmation screen includes an option to add stock to the associated sub-assembly part. If enabled, you can:
- Select the storage location where the build will be stored.
- Enter pricing for the produced sub-assembly. PartsBox calculates a suggested cost based on the components consumed during the build: with lot control, the cost is exact (based on specific lot prices), and without lot control, it is estimated from average part costs. The suggested cost is shown in the price field and can be adjusted before confirming. For multi-stage builds, pricing is entered when finishing the build, since the actual costs are known at that point.
- Add comments related to the build.
Upon confirmation, the stock of the sub-assembly part will be incremented by the build quantity. As sub-assembly parts behave like regular parts, they can be used in other projects and builds, and features such as low-stock warnings and attrition parameters can be configured.
When lot control is enabled, each build of a project results in a distinct lot of the corresponding sub-assembly part, identified by a unique ID Anything™ code. By attaching ID Anything™ labels to manufactured devices, you can quickly scan the code using a mobile device to access the associated build information.
Viewing Build Results
When viewing a build for a project with a sub-assembly part, the Build Results tab in the left navigation shows the resulting stock created from that build. This works similarly to the Stock Used view described above: with lot control, you get full per-lot detail (lot name, quantity, storage location, comments) and bulk operations (tagging, moving, adjusting stock counts); without lot control, a summary of storage locations, quantities, and comments is shown.
Tracking Individual Devices with Serial Numbers
PartsBox can track individual devices built from projects/BOMs. When starting a build, you can enable the option "Track each resulting sub-assembly separately". This changes the build process to generate individual lots for each sub-assembly built, effectively assigning a unique serial number to every device.
Enabling this option lets you track the lifecycle of individual devices. Lots in PartsBox already carry a significant amount of data and have unique ID Anything™ codes assigned to them. You can attach additional data to these lots in the form of files, such as test results, repair protocols, regulatory filings, service history, or any other relevant information.
Each lot is assigned a unique ID Anything™ code, which can be printed as a QR code and physically attached to the corresponding device. This allows for easy identification and tracking of individual devices. Alternatively, devices can be identified by a combination of the build ID Anything™ code (pointing to the specific build) and an integer serial number automatically assigned within that build.
When the option to add sub-assembly part stock is enabled for a multi-stage build, PartsBox keeps track of the stock that is currently in production. This allows you to attach information about potential abnormalities in production or individual test results to each device lot as the devices are being built. Upon completing the build, the stock status changes from "In Production" to "Available".
Purchasing
Purchasing
Orders
PartsBox supports three types of orders, each representing a different stage in the purchasing process:
- Open Orders: These orders are in the initial stage and can be freely modified. You can add or remove parts, adjust quantities, and make any necessary changes before finalizing the order. Open orders provide flexibility during the planning and budgeting phase.
- Ordered: Once an open order is placed with a distributor, it transitions to the "Ordered" state. This indicates that the order has been submitted and is awaiting fulfillment. An expected delivery date is associated with ordered items, allowing you to track when the parts are scheduled to arrive.
- Received: When all the items from an order have been successfully delivered and processed, the order is marked as "Received". This signifies that the purchasing process for that specific order is complete, and the received parts are now available in your inventory.
To create an order or add items to an existing open order, you can start by reviewing the pricing and offers for a single part or by working with a Purchase List. PartsBox allows you to add individual offers or a group of offers to an order, associating them with the corresponding vendor who provided the pricing.
When modifying quantities in an open order, PartsBox automatically retrieves the current pricing information and adjusts the total price based on the quantity and any applicable price breaks. This ensures that you always have up-to-date and accurate pricing for your orders.
Open orders can be transferred to a distributor's website through copy and paste, or they can be exported in a suitable format if a more formal printed purchase order is required.
The most efficient way to place an order with a vendor is by utilizing the 'Upload cart' feature. This allows you to copy and paste or upload a CSV file containing the order details.
When you mark an open order as 'Ordered', PartsBox prompts you to provide an expected delivery date. This information helps you keep track of when your parts are anticipated to arrive and enables the system to display the ordered stock in various relevant sections of the application.
If needed, you can cancel an order, which reverts its status back to 'Open' and removes the expected stock from being displayed.
PartsBox offers several convenient methods for receiving parts from an order:
- Order Receiving Interface: This interface allows you to efficiently receive all or a portion of the parts from an order into a single storage location with just a few clicks.
- Add Stock Dialog: When viewing a single part, you can use the Add Stock dialog to receive items against a specific order. The dialog pre-fills the quantity and price based on the order details.
- Barcode Scanning: Depending on the capabilities of the distributor, scanning a barcode can either display the Add Stock dialog with pre-filled quantity, or in the case of barcodes that incorporate the PartsBox code, directly receive the part against a specific order, automatically populating the quantity, pricing, and order information.
For a part with a unit of measure, an order is placed in whole vendor packages, such as whole spools or reels. When you receive the order, PartsBox converts the received packages into the part's unit using the part's package quantity, so the stock is recorded in that unit. For example, receiving 2 spools of a part with a package quantity of 10000 mm adds 20000 mm of stock.
Purchase Lists
When planning for the production of multiple electronic devices, it is often necessary to purchase components in bulk. However, determining the exact quantities needed can be challenging, especially when considering existing local stock and shared parts across different BOMs (Bills of Materials).
The presence of meta-parts, part substitutes, and BOM substitutes adds another layer of complexity to the purchasing process. Until the moment of ordering, it is beneficial to maintain flexibility in choosing specific MPNs (Manufacturer Part Numbers).
To initiate the purchasing process, navigate to the 'Projects' section and begin adding projects/BOMs to your project shopping cart using the 'Add to Cart' buttons located at the bottom of each project card. When adding a project, you will have the opportunity to specify the quantities you intend to build.
Once you have added the desired projects to the cart, assign a descriptive name to your list and click 'Create Purchase List'. This action will redirect you to the 'Purchasing' section, where you can view all your purchase lists.
Clicking on a specific purchase list will open the familiar pricing interface, similar to the one used for Project/BOM pricing. This interface allows you to select offers, add your own offers, choose specific substitutes (for meta-parts), and limit your selection to preferred distributors.
After finalizing your purchase list, switch to the 'Group by Distributor/Vendor' view to see your parts organized into separate orders for each vendor. This view provides the same functionality as the 'All Parts' view, enabling you to modify offer choices if needed. Additionally, you can quickly add all parts to a new or existing order with a specific vendor and proceed to place the order directly with them.
While automatic ordering support has always been part of the long-term plan, its implementation remains challenging due to the complexities involved in integrating with various distributors' systems.
Inventory and Reports
Inventory Valuation
PartsBox calculates the value of your parts inventory using purchase prices entered when adding stock. Understanding how this valuation works helps with financial reporting and inventory management. The part source selection strategy (FIFO, LIFO, etc. — see the Building Projects section) also affects valuation: with lot control, it determines which specific lot costs are attributed to each build, while without lot control the average cost is used.
Key Metrics
For each part, PartsBox tracks:
- Purchase Value: The total amount paid for all stock added. This represents the actual money spent on acquiring the parts.
- Average Purchase Price: Calculated from all add-stock operations where a price was entered. This is the weighted average cost per unit.
- Total Value: The estimated current value of on-hand stock. With lot control, each lot is valued at its own purchase price and the values are summed; lots added without a price are not included in the estimate. Without lot control, it is the average purchase price multiplied by the current stock quantity.
Valuation with Lot Control
When lot control is enabled, PartsBox values each lot at its own recorded purchase price rather than a single average:
- Each lot keeps the purchase price entered when its stock was added.
- When parts are used in builds, cost is attributed to the specific lots consumed.
- Lot splits inherit the price from the parent lot.
- A lot whose stock was added without a price is not included in the value estimate. When on-hand stock has no recorded price at all, the estimated total value is shown as unknown rather than as zero.
Per-lot valuation is useful for:
- Cost-of-goods-sold (COGS) calculations
- Inventory valuation that reflects what each batch actually cost
- Tracking cost variations between purchase batches
Valuation without Lot Control
Without lot control, PartsBox uses the average cost method for inventory valuation:
- All stock of a part is treated as fungible (interchangeable)
- The average purchase price is calculated across all purchases
- When stock is removed, it is valued at the current average price
- This method provides a reasonable approximation when exact lot tracking is not required
Reports
Reports allow you to get overview information about your data.
Like everything else in PartsBox, reports update in real-time. As an example, if you keep a 'Low Stock' report open, and somebody else removes stock (which will cause the stock for a particular component to go below a threshold), your report will be instantly updated.
Organizations and Access
Organizations (Companies)
PartsBox supports collaboration through the concept of organization (companies). A company or organization in PartsBox represents a shared database that multiple users can access simultaneously. This allows teams to work together on managing their electronic parts inventory, purchasing, and production.
When you create a company or organization in PartsBox, you can invite other users to join and collaborate. The number of users that can access a company database depends on your subscription plan. If you need to accommodate more users, you can upgrade your plan accordingly.
To grant someone access to a company database, they must first create a PartsBox account. Once they have an account, an administrator of the company can invite them and grant the appropriate access rights. This allows you to control who has access to your company's data and what actions they can perform.
In addition to company databases, every PartsBox user also has a free private database for personal use. This private database is separate from any company databases you may have access to. You can easily switch between your private database and any company databases using the database switcher located at the top of the PartsBox app screen. The switcher displays the name of the currently selected database.
Organizations can upload a company logo in Settings > General. The logo is displayed in PDF exports, including table exports and BOM pricing PDFs, replacing the default PartsBox logo in the document header.
Access Rights
PartsBox offers flexible access control options to ensure that users have the appropriate permissions based on their roles and responsibilities within the company. A company always has at least one 'admin' user who possesses the highest level of control and can manage billing information and grant or revoke access to other users.
For plans without Role-Based Access Control (RBAC), PartsBox provides three basic access levels:
- Admin: Users with admin access have full control over the system. They can read and write database data, manage user access, modify billing information, delete all data, and cancel the subscription. Admins have the highest level of responsibility and should be carefully assigned.
- Read/Write: Users with read/write access can view and modify database data, such as creating and updating parts, storage locations, projects, and builds. However, they cannot manage user accounts, billing information, or the subscription. This level is suitable for users who actively work with the inventory and need to make changes.
- Read Only: Users with read-only access can view the database data but cannot make any modifications. This level is appropriate for users who need to access information for reference purposes but do not require the ability to make changes.
For plans with Role-Based Access Control (RBAC), PartsBox offers a more granular and customizable approach to access management. With RBAC, companies can define any number of roles and assign them to users based on their specific responsibilities. Each role defines permissions for individual operations, such as creating parts, adding stock, or performing builds.
RBAC allows for fine-grained control over permissions, enabling companies to create limited roles with restricted access. For example, a 'Receiving' role could be defined to allow users to add and move stock but not modify projects or perform builds. This role would be suitable for employees responsible for receiving and organizing incoming inventory.
Similarly, a 'Production' role could be created to allow users to perform builds from predefined projects but not modify the projects themselves. This role would be useful for employees involved in the manufacturing process who need to assemble products based on established designs.
Audit Trail
In larger organizations, maintaining an immutable audit trail of all database modifications is often necessary for regulatory compliance and traceability. This is particularly important for companies subject to regulations such as US FDA Title 21 CFR Part 11, which mandates strict record-keeping and data integrity requirements.
Even in the absence of legal obligations, many companies choose to implement an audit trail as a best practice for ensuring accountability and facilitating root cause analysis in case of issues or discrepancies.
PartsBox plans with the Audit Trail feature automatically record a detailed history of every change made to the database. Each audit trail record includes:
- A precise timestamp of when the modification occurred
- The user account responsible for the change
- Detailed data describing the specific nature of the modification
This information provides a comprehensive and granular view of the database's evolution over time, allowing administrators to reconstruct the sequence of events and understand the context behind each change.
Viewing the audit trail requires administrator rights. The "View audit trail" permission can also be granted to custom roles, so organizations can give auditors read access to the audit trail without full administrative rights.
Audit trail data can be easily exported from PartsBox in a format suitable for digital signing and long-term archival. This exported data serves as a verifiable record of the system's history, which can be used to demonstrate compliance with relevant regulations during audits or inspections.
Scanning, Printing, and Identification
ID Anything™
Every object in PartsBox — parts, lots, storage locations, builds, orders, and projects — is automatically assigned a unique, compact identifier called an ID Anything™ code. These codes are short enough to be human-readable (26 characters) and can be encoded as QR codes for scanning.
ID Anything™ codes serve several purposes:
- Physical labeling: Print QR labels for storage locations, lots, builds, or any other object. Scanning a label with a mobile device takes you directly to that object in PartsBox.
- Device tracking: When building projects with lot control, each build and each resulting lot gets its own ID Anything™ code. With per-device serial number tracking enabled, every manufactured device can be individually identified, enabling full lifecycle traceability — from the components that went into it to field service records attached later.
- Quick access: Every object's information screen shows its ID Anything™ code in the top right corner. Click it to see the QR code, print a label, or copy the code.
- CAD integration: Store ID Anything™ codes in your CAD part library to get instant, exact BOM-to-parts matching when importing BOMs into PartsBox.
The ID Anything™ system is used throughout PartsBox. The sections below describe these features in detail.
Scanning Barcodes
Scanning barcodes is a quick and efficient way to process incoming shipments, add or remove stock, and create new parts in PartsBox. This feature improves your inventory management workflow, saving time and reducing manual data entry.
Barcode Scanning Methods
PartsBox supports two methods for scanning barcodes:
- External Barcode Scanner: Using a dedicated barcode scanner is the recommended approach for regular, high-volume operations. External scanners offer faster and more reliable scanning performance. Refer to the 'Barcode Scanners' section in this manual for details on supported scanners and setup instructions.
- Built-in Camera: If you don't have an external scanner, you can use your computer's built-in camera to scan barcodes. While not as fast as an external scanner, this method is convenient for occasional scanning needs.
Scanning Process
To start scanning barcodes, click on the 'Scan' menu button in PartsBox. Depending on your scanning method:
- If using an external scanner, PartsBox will wait for input from the scanner.
- If using the built-in camera, PartsBox will display a live camera feed for you to position the barcode in front of the camera.
After a barcode is successfully decoded, PartsBox analyzes the data and takes one of the following actions:
- Existing Part: If the scanned part already exists in your PartsBox database, you will be presented with options to add stock, remove stock, or move stock for that part.
- New Part: If the scanned part doesn't exist in your database, PartsBox will prompt you to create a new linked part. It will provide a list of matching online parts to choose from. Once you select a match and create the part, the 'Add Stock' dialog will appear, allowing you to add the newly received stock for the newly created part.
Supported Barcodes
PartsBox supports a wide range of barcode formats commonly used by electronic component distributors:
- 2D Barcodes:
- DataMatrix and PDF417 barcodes containing ANSI MH10.8.2 data encoded using ISO/IEC 15434:2006 (used by DigiKey, Würth, and others distributors moving to 2D barcodes).
- QR codes from some distributors (LCSC and TME).
- ID Anything™ codes
- 1D Barcodes:
- Barcodes from DigiKey, Mouser, Farnell, RS Components, and most others that encode the Manufacturer Part Number (MPN) in the barcode.
If the scanned barcode includes quantity information, it will be automatically prefilled in the 'Add Stock' dialog.
DigiKey Orders
If you created your DigiKey order within PartsBox and copied the generated ID codes into your DigiKey cart, the barcodes on your received parts will contain PartsBox IDs. When scanning these barcodes, PartsBox will automatically identify the associated order and line item, allowing you to easily receive the parts against the order.
Label Printing
You can print labels for parts, lots, storage locations, orders, projects, and builds directly from PartsBox. There is a templating system that allows you to customize the labels to your needs.
What you need for direct label printing:
- A Zebra label printer, or any other printer that can interpret ZPL (Zebra Printer Language). Any ZPL-capable Zebra printer should work, so pick one according to your needs. Please be careful: some Zebra printers only support EPL, not ZPL, these will not work with PartsBox.
- JSPrintManager version 8 installed locally on the computer where the printer is connected. JSPrintManager is available for Mac, Windows, Linux and Android. You can Download JSPrintManager version 8 for free. Please note that PartsBox currently works with JSPrintManager version 8 only: the newer version 9 is not supported yet, and we are working on adding support for it. If you have installed version 9, please also install version 8 (both versions can be installed on the same computer). We apologize for the inconvenience.
The reason for the JSPrintManager requirement is because browsers have no direct access to printers. In order to send raw codes to a printer, PartsBox needs to connect to JSPrintManager locally and ask it to send data to the printer.
Printer Configuration
If you have the prerequisites, going to 'Settings | Labels | Printer' should show a list of printers available in your system. Select your ZPL-compatible label printer there.
Label Templates
There are multiple label categories: Parts, Lots, Storage locations, Orders, Projects and Builds. In each of those categories, PartsBox lets you define multiple label templates. This lets you quickly switch between various label types or sizes. In commercial plans, label templates are shared within the entire company.
To create a new label template, navigate to 'Settings | Labels' and select one of the categories. If you click 'Create' in the selected category, you will see a pre-filled template with an example label. These examples have been carefully prepared to be a good default with 2.25x1.25 inch labels (yes, Zebra specifies label dimensions in inches only, these are 57.15mm x 31.75mm).
On the left side of the label template form, you will see:
- Label name: pick a name that lets you quickly remember what the label is for
- Label template ZPL code: this is where ZPL code used to generate the label goes. We suggest using Labelary Viewer to write and test your label code, as it has excellent online documentation that appears whenever the cursor is placed on a ZPL command. Data fields that you want filled in with PartsBox data should be marked with numbers in curly brackets. Field numbering starts from 0 (not 1), so use {0} for your first field, {1} for the second, and so on. PartsBox will replace these markers with actual data when generating the label.
- Label width and Label height: these are the label dimensions, in inches. These must match your actual label stock dimensions.
- Dots per mm: the resolution you will be printing at, which depends on your printer.
- Example preview: if your template is ready, you can click 'Generate' to show a preview image of your label using a random object from your database. You can also try a test print of the label if your printer is configured and ready to print.
On the right side of the label template form there is a "Fields" section. This lists the data fields in your template (marked with numbers in curly brackets). PartsBox automatically detects fields based on the highest number used in your template. For example, if you use {0}, {1}, and {5} in your template, you'll have 6 fields to configure (fields 0 through 5). For each of those fields, you can choose any available PartsBox data field. We suggest typing on your keyboard to search, because there are so many PartsBox data fields to choose from.
Once you click 'Save', your template will be available for use.
Printing Labels
Once you have selected a printer and created at least one label template, you can print labels for any object in PartsBox.
To print a label, open the information screen for the object you want to label. For parts, this is the part information screen; for storage locations, the storage location information screen; and similarly for other objects. In the top right corner of the information screen, look for the ID Anything™ button, which displays a small QR code icon and a short version of the ID Anything™ code. Click this button to open a dialog that shows a template selector, a preview of the label, and a 'Print Label' button.
Barcode Scanners
PartsBox supports barcode scanners that generate keystrokes, which includes most USB scanners. The Zebra LS2208 is a reliable and affordable 1D scanner that works well with PartsBox. However, as component distributors are increasingly adopting 2D barcodes for their superior data storage capacity, a 2D scanner is recommended for future-proofing your setup.
To use a 2D scanner with PartsBox, you must configure it to replace special non-printable characters (ASCII codes RS, GS, and EOT) with the strings '{RS}', '{GS}', and '{EOT}', respectively. This is necessary for the scanner to work correctly with web-based applications. If you have a Zebra DS2208 scanner, simply scan the provided barcode to automatically configure it for use with PartsBox:
Supported Scanners
Any 1D scanner that supports the USB HID interface (i.e., acts as a keyboard) should work with PartsBox. If the scanner's output is visible in a text editor, it is compatible with PartsBox.
2D scanners known to work well with PartsBox include:
- Zebra DS2208
- Zebra DS2278 (cordless version of the DS2208)
The Zebra DS6608 (discontinued in 2007) is known not to work with PartsBox.
To use a 2D scanner with PartsBox, the scanner must support string replacements in scanned codes (known as 'Advanced Data Formatting' or 'ADF' in Zebra scanners). This is a limitation of web browsers, not PartsBox.
For the best barcode scanning experience, PartsBox recommends using a dedicated 2D scanner, specifically the Zebra DS2208. A 2D scanner can decode both 1D and 2D barcodes, ensuring compatibility with the growing trend of 2D barcodes used by distributors.
A more affordable alternative is the Barcode to PC app, which consists of software installed on your PC and a mobile app for scanning. While this solution does not currently work reliably with DataMatrix codes, improvements are expected in the future.
Known Issues and Limitations
- If you use a non-US keyboard layout, additional scanner setup is required. After scanning the PartsBox setup barcode, scan the regional code for your keyboard layout from the manual provided with your scanner.
- Scanning may not work reliably in Firefox on Windows. Using an alternative browser, such as Chrome or Edge, is highly recommended.
Troubleshooting
Due to factors beyond PartsBox's control, 100% reliability cannot be guaranteed when using USB scanners for barcode scanning.
If a 2D scanner isn't working with PartsBox:
- Check its output in a text editor like Notepad
- Scan a 2D barcode and verify the result contains the '{RS}', '{GS}', and '{EOT}' sequences
- If these sequences are missing, ensure the scanner is configured for special code replacements
- If using a non-US keyboard layout, scan the appropriate regional setup code from your scanner's manual
Please refer to the 'Known Issues and Limitations' section above to see if your problem is listed. If the scanner's output in Notepad appears correct but PartsBox still cannot recognize the barcode, use the feedback form to report the issue.
Publishing Your Parts Database
PartsBox allows you to make your parts database public, sharing some or all of your parts with others. This feature is useful for hobbyists who want to share their parts inventory, as well as for makerspaces that want to showcase available components.
Setting Up Your Public Page
To publish your parts, navigate to the Settings | Publishing section. Here, you can enter information about yourself or your organization, such as a brief description, a URL, and a longer description. This information will be displayed on your public page.
Note that your public page will only exist if you have selected parts for publishing. Updates to the public page are not instant and may take anywhere from several minutes to an hour.
Selecting Parts for Publishing
PartsBox offers three options for selecting parts to be made publicly visible:
- Nothing: Choose this option if you do not want to publish any parts. Your public web page will not exist.
- Parts that match filter conditions: Use the "Edit filters" button to create filters based on part data. Only the parts that pass the filtering criteria will be published. A common approach is to use tag-based filtering. For example, you can set up a filter to publish only parts that have the tag "public".
- All your parts: Select this option to make your entire parts database available publicly.
By carefully selecting which parts to publish, you can control the information that is shared with others while keeping your other data private.
Integration with CAD tools
KiCad Integration
PartsBox integrates with KiCad version 7.0 or later, allowing you to access your PartsBox component data directly within KiCad's Symbol Chooser. This integration uses KiCad's HTTP Libraries feature.
KiCad HTTP libraries function as read-only interfaces to external data sources like PartsBox. They don't store symbol or footprint data themselves but reference symbols and footprints defined in standard KiCad libraries (.kicad_sym). When you select a component from the PartsBox HTTP library in KiCad, it populates the schematic symbol with data from PartsBox, such as the manufacturer part number (MPN), value, footprint, and other specified fields.
Configuration in PartsBox
To configure KiCad integration in PartsBox:
- Navigate to 'Settings'.
- Select the 'CAD Integration' tab.
- Choose 'KiCad' from the left-side menu.
The configuration is divided into these sections:
General Options
- Initial filter applied to all parts: This filter restricts which parts from your database are potentially available to KiCad. Only parts matching this filter will be considered for inclusion in categories. You can edit the filter criteria or reset it to default (no filter). A count of parts passing this filter is displayed.
Categories
Categories define subsets of your parts database that will be visible as separate browsable sections within the KiCad Symbol Chooser.
- A default "All parts" category includes all parts passing the initial filter.
- You can create custom categories using filters. For example, you could create categories for "Resistors", "Capacitors", or "Connectors".
- For each category, you define a name, an optional description, and the filter criteria.
- The number of parts within each category is displayed.
Fields
This section controls how PartsBox part data maps to KiCad symbol fields.
- PartsBox provides default mappings for common fields like MPN, Manufacturer, Datasheet URL, and the specific KiCad fields configured per part.
- You can customize these mappings:
- Add new mappings from PartsBox fields (including standard fields, custom fields, specs, and specific KiCad fields) to KiCad fields.
- Specify the KiCad field name. Standard KiCad fields include
Value,Footprint,Datasheet,Keywords,Reference,MPN,Manufacturer. You can also define custom field names. - Choose whether the field should be visible in the schematic by default.
- Some mappings are built-in and cannot be changed. The
symbolIdStrmapping is essential: it tells KiCad which symbol to use from your standard KiCad libraries. This is always mapped to the "[Part] KiCad symbol" field in PartsBox. - ID Anything™ is used for matching imported BOMs to parts and is always mapped to KiCad "PartsBox ID" field.
- ID Anything™ URL is used for quickly jumping to the part info page in PartsBox (where the datasheets can be accessed), so it is always mapped to KiCad "datasheet" field. This lets you press 'd' in KiCad to open the part information page in PartsBox.
- It is recommended to map
Footprintto "[Part] KiCad footprint" andReferenceto "[Part] KiCad reference".
KiCad Configuration
This section provides the configuration file needed by KiCad.
- PartsBox generates the content for a
.kicad_httplibfile. - This file contains the necessary information for KiCad to connect to the PartsBox API, including the API endpoint URL and your unique access token (API key).
- You can copy the configuration text to the clipboard or download it as a file.
Configuration in KiCad
To enable the PartsBox library in KiCad:
- Save the configuration generated in the previous step into a file named
partsbox.kicad_httplib(or any name with the.kicad_httplibextension). - Place this file in a location accessible by KiCad, such as a KiCad library directory or a custom location.
- In KiCad, go to 'Preferences' -> 'Manage Symbol Libraries...'.
- In the 'Symbol Libraries' dialog, click the '+' button or 'Add Library'.
- Navigate to and select the
partsbox.kicad_httplibfile you saved. - (Optional, recommended) Name the library so that it appears before other libraries in the symbol chooser, for example "*PartsBox Library".
- Ensure the library is enabled (checkbox ticked) and click 'OK'.
The PartsBox library will now appear in the KiCad Symbol Chooser. You can browse the categories you defined and select parts.
Setting KiCad Fields per Part
For the integration to function correctly, PartsBox needs to know which KiCad symbol, footprint, and reference prefix to associate with each part. This is configured within the part details view:
- Open the details page for a specific part in PartsBox.
- Go to the 'Part Settings' tab on the left.
- Locate the 'CAD/PLM data' section.
- Fill in the following fields:
- KiCad symbol: The full KiCad symbol name, including the library alias (e.g.,
Device:R,MyLibrary:MySymbol). This value will be mapped to thesymbolIdStrfield in KiCad. - KiCad footprint: The KiCad footprint name, including the library alias (e.g.,
Resistor_SMD:R_0603_1608Metric). - KiCad reference: The default reference designator prefix (e.g.,
R,C,U).
Saving these settings makes them available via the API for KiCad to use when the part is selected.
In the future, there will be a way to set these fields for multiple selected parts at once (for example, select all parts with a "resistor" tag and set their KiCad reference to "R").
Data Exchange and Caching
- When you open the Symbol Chooser in KiCad, it fetches the list of categories and the parts within the currently selected category from PartsBox.
- KiCad caches the category list for performance reasons. Changes to category definitions in PartsBox might require restarting KiCad to be visible.
- When you select a specific part in the Symbol Chooser, KiCad requests detailed information for that part from PartsBox using the mappings defined in the 'Fields' configuration.
- This detailed information populates the fields of the symbol placed on the schematic.
Integration with Altium Designer®
You can make your PartsBox library accessible in Altium Designer. Your symbols and footprints will still live in Altium, while all other data about parts will be accessed from PartsBox. Integration with Altium Designer is slightly more complex to configure because of its legacy ODBC database connection requirements.
You will need to run PartsBox Outpost™ on your machine. It is an application that provides real-time synchronization with your online PartsBox database and offers an SQL interface that Altium Designer can connect to. Outpost™ is shipped as a Docker container. For now, the synchronization is one-way only, so there is no way to make changes to your PartsBox database from within Altium, but this might change in the future.
Prerequisites:
Start by installing the PostgreSQL ODBC driver. Then, install Docker Desktop, and download the jrychter/outpost:latest image from Docker Hub.
In Docker Desktop, click the Run icon next to the image name in the "Images" section. Then open the "Optional settings" section.
In the "Ports" section, enter 5432 for the host port corresponding to :5432/tcp.
In the "Environment variables" section, create two environment variables:
PARTSBOX_API_KEY: this should contain your PartsBox API keyPOSTGRES_PASSWORD: database password that you will use in Altium Designer to connect to the database
Click the "Run" button and you should see a running container in the "Containers" section. If you click on the container, you can check the logs for any abnormal messages.
After that, you can create a DbLib or DbLink in Altium (please see Altium Designer documentation for details on the differences between these). Choose "File | New | Library" from the main menu, then choose "Database Library".
In the "Source of connection" section, choose "Use connection string". Then configure the following connection string: Driver={PostgreSQL Unicode};Server=localhost;Port=5432;Database=postgres;UID=postgres;PWD=YOUR_PASSWORD_HERE
Make sure to use the same database password that you used when starting the Docker container. Also, please make sure there are no spaces at the end of the connection string.
Click the "Advanced" button. In SQL options, change the left and right quote characters to be double quotes (") and leave the "Quote Tables" option checked.
Click "Connect". You should see database fields appear in the table just below field settings.
In the "Field Settings" section, choose "Single Key Lookup", and for the "Database" field, choose "PartsBox ID".
At this point, you should have a working database connection with automatic mapping of essential fields. You will probably want to save this database.
If the connection fails with an error message, one thing to check is the name of the ODBC driver that is being referenced in the connection string. To list all ODBC drivers on your machine, you can use the Windows PowerShell and the following command: Get-OdbcDriver. You would then use the appropriate driver name of one of the listed drivers in the connection string.
API
PartsBox provides an API for programmatic access to your parts database. The API is operation-oriented: rather than exposing database objects directly, it provides specific operations for managing parts, stock, storage locations, projects, BOMs, orders, builds, lots, and more. This enables integration with other systems such as ERP, MES, or custom tooling.
The API uses JSON for requests and responses (with EDN as an alternative) and authenticates using API keys. To generate an API key, go to Settings in your organization.
For full documentation, including available operations, request/response formats, and examples, see the API documentation.
Table of Contents
- Introduction
- Getting Started
- Working with Data
- Parts
- Stock and Storage
- Builds
- Building Projects
- Single-stage Builds
- Multi-stage Builds
- Build Configuration History
- Viewing Stock Used
- Kitting
- Using Sub-assembly Parts
- Tracking Individual Devices with Serial Numbers